Ga door naar hoofdinhoud

Alienware M18x CD Drive Replacement

Wat je nodig hebt

  1. Alienware M18x CD Drive Replacement, Battery: stap 1, afbeelding 1 van 1
    • Flip the laptop over and slide the battery release latch to the right.

  2. Alienware M18x CD Drive Replacement: stap 2, afbeelding 1 van 2 Alienware M18x CD Drive Replacement: stap 2, afbeelding 2 van 2
    • Remove battery.

  3. Alienware M18x CD Drive Replacement, Keyboard: stap 3, afbeelding 1 van 3 Alienware M18x CD Drive Replacement, Keyboard: stap 3, afbeelding 2 van 3 Alienware M18x CD Drive Replacement, Keyboard: stap 3, afbeelding 3 van 3
    • Turn the computer over.

    • Slide the battery latch over and lift the battery out.

  4. Alienware M18x CD Drive Replacement: stap 4, afbeelding 1 van 1
    • Unscrew the four 3mm screws with a J000 screwdriver.

  5. Alienware M18x CD Drive Replacement: stap 5, afbeelding 1 van 2 Alienware M18x CD Drive Replacement: stap 5, afbeelding 2 van 2
    • Use the iFixit opening tool to lift the bottom cover off.

  6. Alienware M18x CD Drive Replacement: stap 6, afbeelding 1 van 2 Alienware M18x CD Drive Replacement: stap 6, afbeelding 2 van 2
    • Remove the two 4mm screws with the J000 screwdriver.

  7. Alienware M18x CD Drive Replacement: stap 7, afbeelding 1 van 3 Alienware M18x CD Drive Replacement: stap 7, afbeelding 2 van 3 Alienware M18x CD Drive Replacement: stap 7, afbeelding 3 van 3
    • Turn the laptop right-side up, and open the laptop.

    • Use the plastic pryer tool to loosen the flat piece surrounding the keys by gently prying it upwards from the laptop's base.

    • Make sure to go around the entire perimeter of the piece to loosen all areas of it.

  8. Alienware M18x CD Drive Replacement: stap 8, afbeelding 1 van 3 Alienware M18x CD Drive Replacement: stap 8, afbeelding 2 van 3 Alienware M18x CD Drive Replacement: stap 8, afbeelding 3 van 3
    • The piece is now free from its fastenings to the base of the laptop, and can be lifted off.

    • This piece is still connected to the laptop via power cable. Be sure not to lift it off too far or with too much force, as doing so could potentially rip or damage the cables.

  9. Alienware M18x CD Drive Replacement: stap 9, afbeelding 1 van 1
    • Gently remove the power cable with your hands or with the help of a prying tool.

  10. Alienware M18x CD Drive Replacement: stap 10, afbeelding 1 van 1
    • The keyboard's 3mm fastening screws are now exposed and can be removed with a J000 screwdriver.

  11. Alienware M18x CD Drive Replacement: stap 11, afbeelding 1 van 2 Alienware M18x CD Drive Replacement: stap 11, afbeelding 2 van 2
    • As before, the keyboard is now unfastened but still connected to the base via cables.

    • Flip the keyboard over towards the edge of the laptop to expose the locations of the connectors. Avoid tugging on the cables when you do this.

  12. Alienware M18x CD Drive Replacement: stap 12, afbeelding 1 van 3 Alienware M18x CD Drive Replacement: stap 12, afbeelding 2 van 3 Alienware M18x CD Drive Replacement: stap 12, afbeelding 3 van 3
    • Locate and remove the first connector cable.

    • Use a prying tool to assist in unplugging the cable.

  13. Alienware M18x CD Drive Replacement: stap 13, afbeelding 1 van 3 Alienware M18x CD Drive Replacement: stap 13, afbeelding 2 van 3 Alienware M18x CD Drive Replacement: stap 13, afbeelding 3 van 3
    • Locate and remove the second connector cable.

    • Again, use a prying tool to help remove.

  14. Alienware M18x CD Drive Replacement: stap 14, afbeelding 1 van 3 Alienware M18x CD Drive Replacement: stap 14, afbeelding 2 van 3 Alienware M18x CD Drive Replacement: stap 14, afbeelding 3 van 3
    • The left section of the keyboard is connected by a single screw and two connector cables.

    • Remove the 4mm screw with a J000 screwdriver.

    • Remove the connecting cables with a prying bar.

  15. Alienware M18x CD Drive Replacement: stap 15, afbeelding 1 van 1
    • All sections of the keyboard are now free to be taken off and replaced!

  16. Alienware M18x CD Drive Replacement, CD Drive: stap 16, afbeelding 1 van 3 Alienware M18x CD Drive Replacement, CD Drive: stap 16, afbeelding 2 van 3 Alienware M18x CD Drive Replacement, CD Drive: stap 16, afbeelding 3 van 3
    • Computer should be upright.

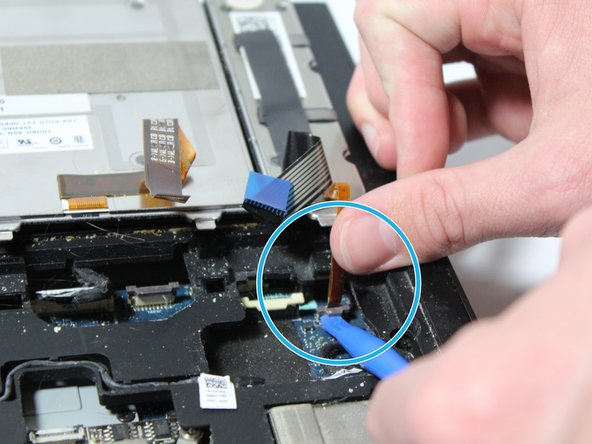
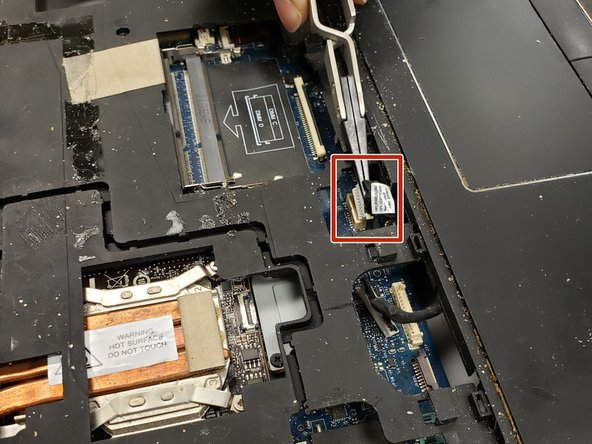
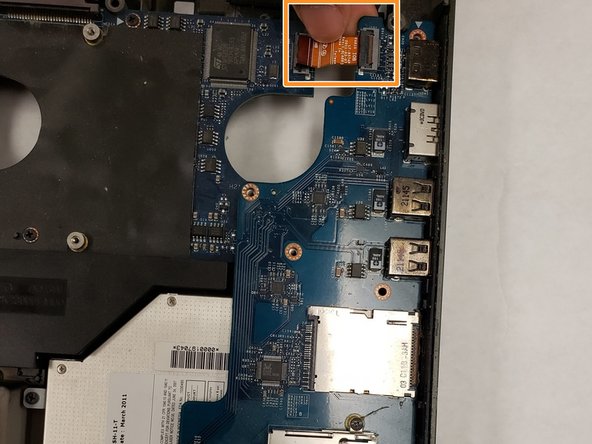
    • Find the connecting tab that is holding the laptop's top section in place.

    • Disconnect the tab with needle-nose pliers.

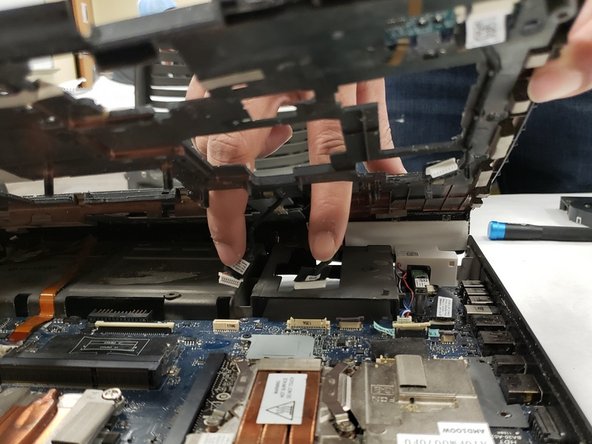
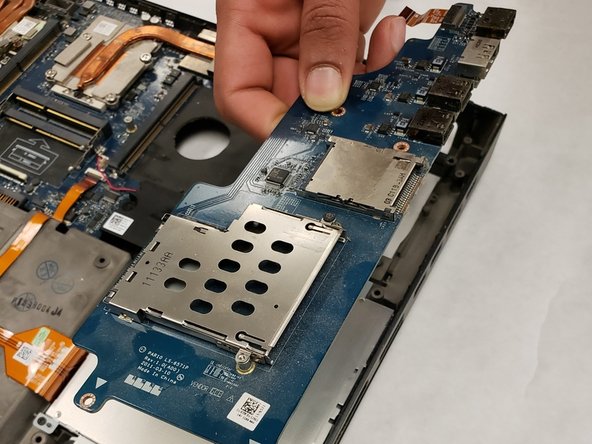
    • Lift the panel up slowly to gain access to the internal parts.

  17. Alienware M18x CD Drive Replacement: stap 17, afbeelding 1 van 2 Alienware M18x CD Drive Replacement: stap 17, afbeelding 2 van 2
    • Track down the blue USB board. The CD Drive is covered by this board.

    • Locate the card holders' edges, and then gently pry each one from its socket

  18. Alienware M18x CD Drive Replacement: stap 18, afbeelding 1 van 3 Alienware M18x CD Drive Replacement: stap 18, afbeelding 2 van 3 Alienware M18x CD Drive Replacement: stap 18, afbeelding 3 van 3
    • With a screwdriver, remove the screws holding the USB port board in place.

    • To remove all connections from the board, disconnect the orange tab.

    • In order to access the CD Drive, raise the board.

  19. Alienware M18x CD Drive Replacement: stap 19, afbeelding 1 van 3 Alienware M18x CD Drive Replacement: stap 19, afbeelding 2 van 3 Alienware M18x CD Drive Replacement: stap 19, afbeelding 3 van 3
    • The CD Drive housing should be free of the four 3mm screws.

    • The orange connector's thin end should be disconnected from the motherboard. The CD Drive should still be attached to one end of it.

    • From the laptop, gently remove the CD drive.

Conclusie

To reassemble your device, follow these instructions in reverse order.

Één andere persoon heeft deze handleiding voltooid.

Anu Kadampelil

Lid sinds: 04/06/19

112 Reputatie

1 Handleiding geschreven

Team

IUPUI, Team S12-G12, Wilson Spring 2019 Lid van IUPUI, Team S12-G12, Wilson Spring 2019

IUPUI-WILSON-S19S12G12

4 Leden

3 handleidingen geschreven

0 opmerkingen

Voeg opmerking toe

Weergavestatistieken:

Afgelopen 24 uren: 0

Afgelopen 7 dagen: 2

Afgelopen 30 dagen: 11

Altijd: 479