Inleiding
You will learn how to access and remove the components of the guitar keys. Skip down to step 3 once the neck is separated from the body if you are not concerned with components of the body.
Wat je nodig hebt
-
-
The first thing we want to do is remove the neck from the body. This is necessary to access either the inside of the neck or the body.
-
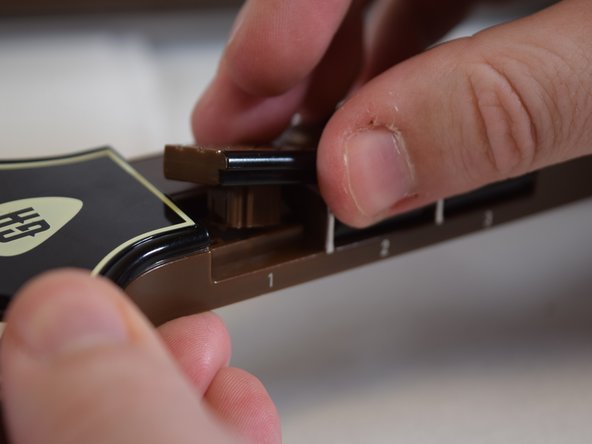
The round tab with a triangle can be turned by inserting a .25" tip Flathead screwdriver and turning. Simultaneously, as the tab turns about a quarter circle, pull the neck and it should slide out with minimal force.
-
Once the neck has been separated from the body remove the eight screws from the back of the neck with a Phillips Head 0 screwdriver. All screws are 12 mm.
-
Next remove the four screws that were covered by the neck.
-
Finally, remove the eight screws from the back of the body.
-
This screw at the bottom of the body is a bit longer than the others.
-
With all the screws out, both the neck and the body shells should open with minimal force.
-
-
-
These are the whammy bar components, we highly recommend removing these components before working on other areas of the body as the whammy bar protrudes making it difficult to rest on a flat surface.
-
To remove the whammy bar, follow the steps included in the whammy bar replacement guide, found on our device.
-
-
-
After opening the controller carefully remove the piece of plastic connected to the strip of wire as shown in the photo.
-
-
-
-
Use a Phillips Head 0 screwdriver to remove the single 12mm silver screw holding the board in place.
-


To reassemble your device, follow these instructions in reverse order.
To reassemble your device, follow these instructions in reverse order.
Annuleren: ik heb deze handleiding niet afgemaakt.
Één andere persoon heeft deze handleiding voltooid.
Team

UW Tacoma, Team 2-4, Rose Winter 2017 Lid van UW Tacoma, Team 2-4, Rose Winter 2017
UWT-ROSE-W17S2G4
4 Leden
12 handleidingen geschreven