Ga door naar hoofdinhoud

Acer Chromebook 15 CB5-571-C09S Battery Replacement

Wat je nodig hebt

  1. Acer Chromebook 15 CB5-571-C09S Battery Replacement, Back Cover: stap 1, afbeelding 1 van 1
    • Place the device on a flat surface faced down so that the fan vents are at the top of the device.

  2. Acer Chromebook 15 CB5-571-C09S Battery Replacement: stap 2, afbeelding 1 van 2 Acer Chromebook 15 CB5-571-C09S Battery Replacement: stap 2, afbeelding 2 van 2
    • Unscrew the eighteen 6 mm PH0 Phillips head screws from the back of the device.

  3. Acer Chromebook 15 CB5-571-C09S Battery Replacement: stap 3, afbeelding 1 van 2 Acer Chromebook 15 CB5-571-C09S Battery Replacement: stap 3, afbeelding 2 van 2
    • Use a plastic opening tool to pry open the back cover around the edges of the device.

    • Be careful not to crack or break the back cover of the device.

    • You will have to adjust the position of the device to pry it open along all the edges.

  4. Acer Chromebook 15 CB5-571-C09S Battery Replacement: stap 4, afbeelding 1 van 2 Acer Chromebook 15 CB5-571-C09S Battery Replacement: stap 4, afbeelding 2 van 2
    • Stand the device up with the hinges on top and carefully pull apart the back cover from the device.

  5. Acer Chromebook 15 CB5-571-C09S Battery Replacement, Battery: stap 5, afbeelding 1 van 3 Acer Chromebook 15 CB5-571-C09S Battery Replacement, Battery: stap 5, afbeelding 2 van 3 Acer Chromebook 15 CB5-571-C09S Battery Replacement, Battery: stap 5, afbeelding 3 van 3
    • The battery is the large black rectangle located in the bottom center of the device.

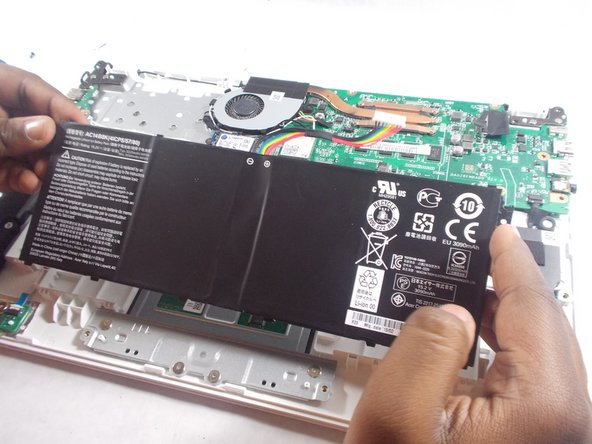
    • Unscrew the single black 5 mm PH00 Phillips head screw holding the battery in place located at the top right corner of the battery.

  6. Acer Chromebook 15 CB5-571-C09S Battery Replacement: stap 6, afbeelding 1 van 3 Acer Chromebook 15 CB5-571-C09S Battery Replacement: stap 6, afbeelding 2 van 3 Acer Chromebook 15 CB5-571-C09S Battery Replacement: stap 6, afbeelding 3 van 3
    • Disconnect the battery connector from the motherboard using two plastic opening tools.

    • The battery connector is the white "plug" that connects the battery to the motherboard with rainbow colored wires attached to it.

    • Use two of the plastic opening tools on either edge of the battery connector and carefully pull out the battery connector out from the motherboard.

  7. Acer Chromebook 15 CB5-571-C09S Battery Replacement: stap 7, afbeelding 1 van 2 Acer Chromebook 15 CB5-571-C09S Battery Replacement: stap 7, afbeelding 2 van 2
    • Once the battery has been disconnected from the motherboard it can easily be removed from the device.

    • Grab the top edge of the battery and carefully pull it up and out of the device towards you.

Conclusie

To reassemble your device, follow these instructions in reverse order.

8 andere personen hebben deze handleiding voltooid.

Sakiynah Howard

Lid sinds: 10/17/17

1.000 Reputatie

6 handleidingen geschreven

Team

UMass Dartmouth, Team S1-G3, Simcock Fall 2017 Lid van UMass Dartmouth, Team S1-G3, Simcock Fall 2017

UMASSD-SIMCOCK-F17S1G3

3 Leden

12 handleidingen geschreven

2 opmerkingen

Where do you get the plastic opening tools

Kelly Robledo - Antwoord

Instructions were perfect. Used a putty knife to pry off the back

Naomi Harrison - Antwoord

Voeg opmerking toe

Weergavestatistieken:

Afgelopen 24 uren: 0

Afgelopen 7 dagen: 5

Afgelopen 30 dagen: 20

Altijd: 4,062