Inleiding
This guide will take you step by step through the process of replacing your cooling fan.
If your Acer Aspire V5-473P-5602 is making irregular noises, overheating, and running slowly, it could be a sign that your fan needs to be replaced.
Your laptop’s fan is used to cool down your laptop. If your fan is filled with dust, it can make the laptop overheat and cause damage to your hardware.
Before starting this guide, try to clean your fan. If this still does not solve your problem, then use this guide to replace your fan with a new one.
This guide requires you to open the bottom component of your laptop.
Before beginning, ensure your laptop is completely powered off and unplugged.
Wat je nodig hebt
-
-
Flip the laptop over so the back panel is facing upwards.
-
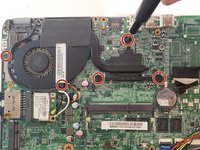
Use the Phillips #0 screwdriver to remove seventeen 2.5mm screws.
-
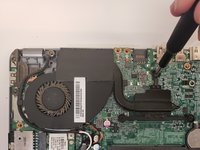
Remove the back panel from the laptop using an iFixit opening tool.
-
-


To reassemble your device, follow these instructions in reverse order.
To reassemble your device, follow these instructions in reverse order.

Team

York University, Team S8-G6, Turner Winter 2020 Lid van York University, Team S8-G6, Turner Winter 2020
YORK-TURNER-W20S8G6
5 Leden
21 handleidingen geschreven