Inleiding
Once you have removed the battery you will be able to remove the motherboard from your device. Make sure the battery is completely removed before working on the motherboard as to prevent shorts in the circuitry As a precautions ground yourself to prevent frying the internal components. Also make sure to keep track of screws and label them.
Wat je nodig hebt
-
-
Use the plastic tool to pry between the silver bezel and the back case
-
Work the tool around the device to free the back case
-
-
-
Remove the ribbon cables by lifting up the white retaining flap on the ZIF connectors, then pulling the ribbon cable away.
In my case (a Z580CA instead of the Z580C pictured) one of the lock tabs was white and the other black, as the previous comment noted, but also the printing on the ribbon cables is slightly different (i.e. the white ribbon cable had “ASUS” printed on its left end, instead of what’s pictured above). What seems more consistent among models is the ID printed on either end of each ribbon cable:
Top (white) cable: “SB” or “FPC_SB” ⟧≣≣≣≣⟦ “MB” or “FPC_MB”
Bottom (orange) cable: “LCM” ⟧≣≣≣≣⟦ “MB”
So, all in all, I agree with the previous comment — it’s enough if you remove the connectors on the “MB” end only.
Bottom line cable holder colors were inverted. I destroyed my tablet because I followed “pry open white part”. :-(
-
-
-
Remove all 9 of the 1.5mm #00 Philips screws
-
Gently lift the battery out of the device
-
Use an opening pick or similar tool to separate the adhesive on the bottom and top of the battery.
The tray only provides a mounting location for the battery which is securely stuck to the tray with foam tape. Pry them gently apart. I reinstalled my tray & screws, then reconnected the power cable and finally placed the battery into the tray. The clone battery is physically smaller than the original and the power cable isn’t in quite the same place but it does fit.
In my case I did remove the metal tray as I found it easier to pull the battery away once I had the tray in my hand. But if you know approximately where to insert a plastic tool to help separate the tape, I fully agree that removing the metal tray is completely unnecessary. FWIW, in my case I had two strips of double-sided tape, running vertically (considering the orientation of the picture above), one of them approximately at the level of the screw in the 11-o’clock position, the other approximately at the level of the 5-o’clock screw.
Also, my tablet (Z580CA) had only eight screws (weird — the one at the 3-o’clock position was missing) and I found them to more closely match a 2.0mm screwdriver head.
The battery part number shown in one of the pictures and what is in my tablet is C11Pn9H. I ordered a Cameron Sino C11P1304 from Amazon that states it’s compatible with a C11Pn9H. It really is not. It’s smaller and the power conector is 1/4” inch away from the corner. I’m sending it back.
I found and ordered on Amazon a DGTECH C11P1510 battery that also states it’s a compatible battery for the Asus ZenPad S 8.0 Z580C Z580CA Z380C Z380C and looks exactly the same as the C11Pn9H but it costs more. $39.99 compared to the Cameron Sino for $23.89. Ouch! almost double the price. Also 1 Year Replacement Warranty as the Cameron Sino battery.
-
-
-
-
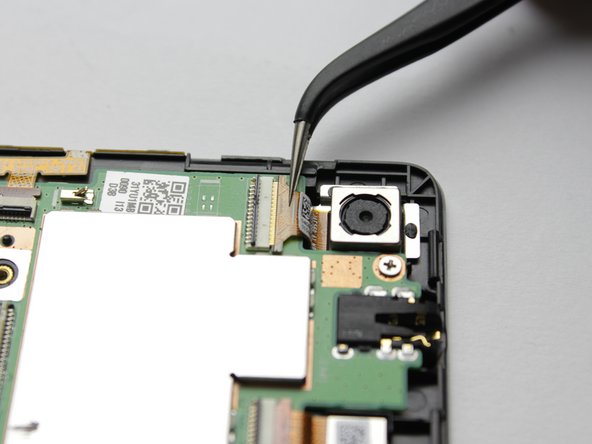
Use a plastic opening tool to lift the black retaining flap on the ZIF Connector
-
-
-
Using the plastic prying tool, lift the small retaining flap on the ZIF Connectors holding the ribbon cables to the motherboard
-


To reassemble your device, follow these instructions in reverse order.
To reassemble your device, follow these instructions in reverse order.
Annuleren: ik heb deze handleiding niet afgemaakt.
Één andere persoon heeft deze handleiding voltooid.

Team

USF Tampa, Team 2-2, Cagle Fall 2016 Lid van USF Tampa, Team 2-2, Cagle Fall 2016
USFT-CAGLE-F16S2G2
4 Leden
5 handleidingen geschreven
2 opmerkingen
Where can I buy a spare motherboard for this device.
Where are the motherboard sold and how do I purchase micro USB ports
Be very careful when prying apart the back case. I was very cautious but still managed to slightly warp the silver bezel at one location, so after reassembly I have one small section of this bezel that won’t snap completely flush with the back case. That said, opening this tablet is surprisingly easy.
Christian Dummer - Antwoord