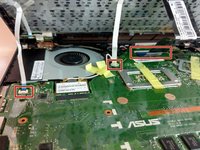
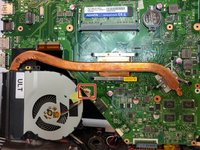
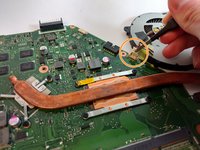
Ga door naar hoofdinhoud

ASUS X550LB-DS71 Fan Replacement

Wat je nodig hebt

  1. ASUS X550LB-DS71 Fan Replacement, Fan: stap 1, afbeelding 1 van 3 ASUS X550LB-DS71 Fan Replacement, Fan: stap 1, afbeelding 2 van 3 ASUS X550LB-DS71 Fan Replacement, Fan: stap 1, afbeelding 3 van 3
    • Make sure to switch off your laptop before starting.

    • Place the laptop on a flat surface with the bottom side facing upwards.

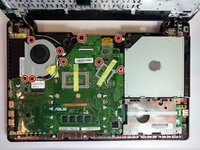
    • Using the Phillips #1 Screwdriver, remove the four 4mm screws in the back panel.

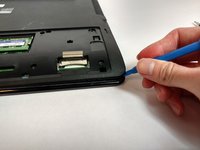
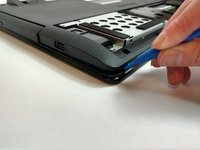
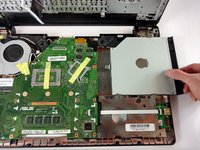
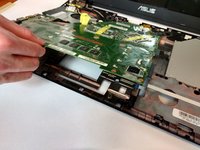
    • Using both hands, slide the back panel away from the laptop horizontally.

  2. ASUS X550LB-DS71 Fan Replacement: stap 2, afbeelding 1 van 1
    • Using the Phillips #0 Screwdriver, remove the ten 2mm screws at the marked locations.

    • At this point, it is advised to disconnect the hard drive from the motherboard.

  3. ASUS X550LB-DS71 Fan Replacement: stap 3, afbeelding 1 van 3 ASUS X550LB-DS71 Fan Replacement: stap 3, afbeelding 2 van 3 ASUS X550LB-DS71 Fan Replacement: stap 3, afbeelding 3 van 3
    • Using the plastic opening tool, open the back cover of the laptop.

    • It is recommended that you start from a corner and run the tool along the edge of the cover.

    • Be careful not to bend or crack the cover.

  4. ASUS X550LB-DS71 Fan Replacement: stap 4, afbeelding 1 van 2 ASUS X550LB-DS71 Fan Replacement: stap 4, afbeelding 2 van 2
    • Locate the three ribbon connectors.

    • Using the plastic opening tool, flip up all three gray tabs and remove the ribbon connectors from the motherboard.

    • Once the tabs are released, the ribbons will be easy to remove. Do not pull on the ribbons.

  5. ASUS X550LB-DS71 Fan Replacement: stap 5, afbeelding 1 van 2 ASUS X550LB-DS71 Fan Replacement: stap 5, afbeelding 2 van 2
    • Using the Phillips #0 Screwdriver, remove the nine 2mm screws at the marked locations.

  6. ASUS X550LB-DS71 Fan Replacement: stap 6, afbeelding 1 van 2 ASUS X550LB-DS71 Fan Replacement: stap 6, afbeelding 2 van 2
    • Disconnect the WLAN Card from the motherboard by pulling the connector upwards.

    • Disconnect the optical drive from the motherboard by sliding it to the right.

  7. ASUS X550LB-DS71 Fan Replacement: stap 7, afbeelding 1 van 3 ASUS X550LB-DS71 Fan Replacement: stap 7, afbeelding 2 van 3 ASUS X550LB-DS71 Fan Replacement: stap 7, afbeelding 3 van 3
    • Flip the motherboard to show the underside.

    • Locate the square fan connection attached to the motherboard.

    • Disconnect it using the tweezers (blunt).

  8. ASUS X550LB-DS71 Fan Replacement: stap 8, afbeelding 1 van 1
    • Remove the black tape from the fan as seen in the marked location.

    • At this point, the fan is now disconnected from the motherboard.

Conclusie

To reassemble your device, follow these instructions in reverse order.

Één andere persoon heeft deze handleiding voltooid.

Nathan Dyer

Lid sinds: 09/25/17

550 Reputatie

5 handleidingen geschreven

Team

USF Tampa, Team S16-G1, Eyestone Fall 2017 Lid van USF Tampa, Team S16-G1, Eyestone Fall 2017

USFT-EYESTONE-F17S16G1

4 Leden

5 handleidingen geschreven

0 opmerkingen

Voeg opmerking toe

Weergavestatistieken:

Afgelopen 24 uren: 1

Afgelopen 7 dagen: 1

Afgelopen 30 dagen: 14

Altijd: 858