Ga door naar hoofdinhoud
ASUS Q536F Battery Replacement

ASUS Q536F Battery Replacement

vanessa galvez

vanessa galvez en 6 andere bijdragers

Voor het laatst geüpdatet op May 7, 2024

15 - 30 minuten
Gemiddeld

Our Asus Q536F laptop's present battery has to be replaced and fixed, therefore here is our guide. Your laptop battery will eventually run out of power no matter how well you take care of it. Many last for several years, but ultimately they begin to deteriorate because of things like wear and tear, exposure to intense heat, and even inactivity. This simple-to-follow tutorial will help users prolong the life of their laptops and replace their outdated computer batteries for less money.

Age, damage to the battery charger, or a problem with your laptop's DC connector could all be contributing factors to the battery's poor performance in holding a charge. Make sure the wires are clean and the battery is appropriate for the particular gadget you are using.

Make sure to have the laptop unplugged and powered off before proceeding.

Wat je nodig hebt

Onderdelen

Gereedschap

  • iFixit Opening Tool
    iFixit Opening Tool
  • T4 Torx Screwdriver
    T4 Torx Screwdriver
  • Phillips #1 Screwdriver
    Phillips #1 Screwdriver
  • Phillips #0 Screwdriver
    Phillips #0 Screwdriver
  • Nylon Tipped Tweezers
    Nylon Tipped Tweezers

Toon meer…

iFixit krijgt commissie als je dingen koopt via deze links.
  1. ASUS Q536F Battery Replacement, Back Panel: stap 1, afbeelding 1 van 2 ASUS Q536F Battery Replacement, Back Panel: stap 1, afbeelding 2 van 2
    • Remove ten 2 mm screws using a Phillips #0 screwdriver.

    • Remove the screw in the center using a T4 Torx screwdriver.

    • Use an iFixit opening tool to pry open the back panel.

    • It's normal to hear some cracking, but proceed with caution.

  2. ASUS Q536F Battery Replacement, Battery: stap 2, afbeelding 1 van 2 ASUS Q536F Battery Replacement, Battery: stap 2, afbeelding 2 van 2
    Gereedschap gebruikt in deze stap:
    Tweezers
    $4.99
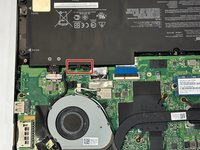
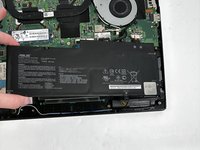
    • Remove the four 2 mm screws from the battery using a Phillips #1 screwdriver.

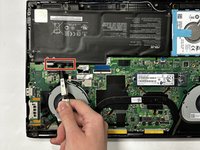
    • Detach the battery cable from the motherboard using a pair of tweezers.

  3. ASUS Q536F Battery Replacement: stap 3, afbeelding 1 van 3 ASUS Q536F Battery Replacement: stap 3, afbeelding 2 van 3 ASUS Q536F Battery Replacement: stap 3, afbeelding 3 van 3
    • Unhinge the fan cable using your fingers or a pair of tweezers.

    • Remove the battery from its slot.

    • There should be no resistance from any cable wiring at this point. If there happens to be resistance, make sure to double check and confirm nothing is being pulled.

Conclusie

To reassemble your device, follow these instructions in reverse order.

Één andere persoon heeft deze handleiding voltooid.

vanessa galvez

Lid sinds: 09/07/23

103 Reputatie

1 Handleiding geschreven

Team

Gateway, Team 88-8, Gonzalez Fall 2023 Lid van Gateway, Team 88-8, Gonzalez Fall 2023

GCC-GONZALEZ-F23S88G8

5 Leden

6 handleidingen geschreven

Één opmerking

Thank you so much!

Vincent - Antwoord

Voeg opmerking toe

Weergavestatistieken:

Afgelopen 24 uren: 0

Afgelopen 7 dagen: 24

Afgelopen 30 dagen: 122

Altijd: 1,696