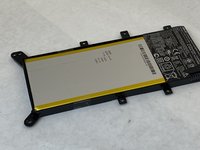
Ga door naar hoofdinhoud

ASUS F555UA-EH71 Battery Replacement

Wat je nodig hebt

  1. ASUS F555UA-EH71 Battery Replacement, Keyboard Panel: stap 1, afbeelding 1 van 1
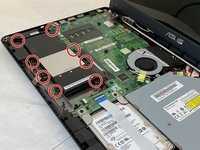
    • Remove the ten 18 mm screws holding down the outer shell of the laptop using the Phillips #000 screwdriver.

  2. ASUS F555UA-EH71 Battery Replacement: stap 2, afbeelding 1 van 2 ASUS F555UA-EH71 Battery Replacement: stap 2, afbeelding 2 van 2
    • Use your fingers to gently pry open the gap between the silver and black parts of the casing.

    • Separate the keyboard panel from the body of the laptop by wedging the iFixit Opening Tool in between the keyboard panel and the body.

    • The teeth of the casing should make a clicking noise as they’re pulled apart.

  3. ASUS F555UA-EH71 Battery Replacement: stap 3, afbeelding 1 van 1
    • Gently open the casing until the white, silver, and gold power strips are visible. Gently peel the strips from the bottom side of the laptop.

    • Disconnect the two cables connecting the keyboard panel to the laptop.

  4. ASUS F555UA-EH71 Battery Replacement: stap 4, afbeelding 1 van 1
    • Remove the keyboard panel from the laptop.

  5. ASUS F555UA-EH71 Battery Replacement, Battery: stap 5, afbeelding 1 van 3 ASUS F555UA-EH71 Battery Replacement, Battery: stap 5, afbeelding 2 van 3 ASUS F555UA-EH71 Battery Replacement, Battery: stap 5, afbeelding 3 van 3
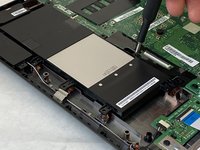
    • Use the Phillips #000 screwdriver to remove the eight 4 mm screws holding the battery in place.

  6. ASUS F555UA-EH71 Battery Replacement: stap 6, afbeelding 1 van 2 ASUS F555UA-EH71 Battery Replacement: stap 6, afbeelding 2 van 2
    • Carefully remove the battery from the device.

Conclusie

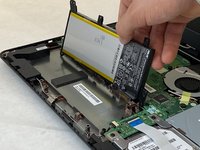
To reassemble your device, follow these instructions in reverse order.

2 andere personen hebben deze handleiding voltooid.

0 opmerkingen

Voeg opmerking toe

Weergavestatistieken:

Afgelopen 24 uren: 0

Afgelopen 7 dagen: 0

Afgelopen 30 dagen: 10

Altijd: 934