Deze versie kan foutieve bewerkingen bevatten. Schakel over naar de recentste gecontroleerde momentopname.
Wat je nodig hebt
-
Deze stap is niet vertaald. Help het te vertalen
-
Remove the six screws holding the primary drive cover on.
-
Lift the cover away. Note that the cables to the alternator will still be attached, so make sure the cover is supported and not pulling on the cables.
-
-
Deze stap is niet vertaald. Help het te vertalen
-
Unscrew the clutch springs with a piece of flat metal.
-
Lift off the clutch cover and withdraw the clutch operating rod and clutch plates.
-
Engage a gear and undo the clutch retaining nut. This is likely to be tight; it will undo more easily if you "shock" it loose with light hammer taps onto a socket driver.
-
-
Deze stap is niet vertaald. Help het te vertalen
-
Remove the kickstart.
-
Remove the gear position indicator (if fitted) and the gear lever.
-
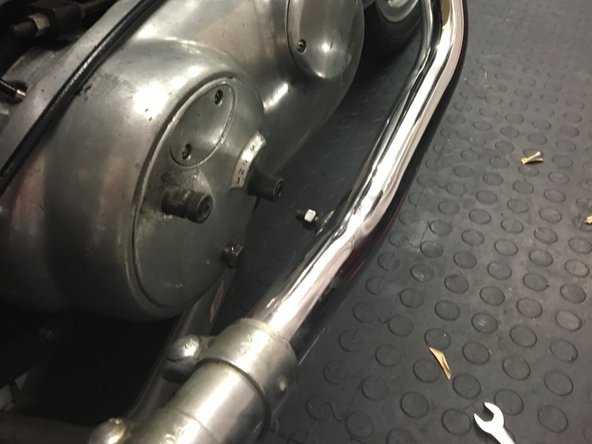
Remove the exhaust.
-
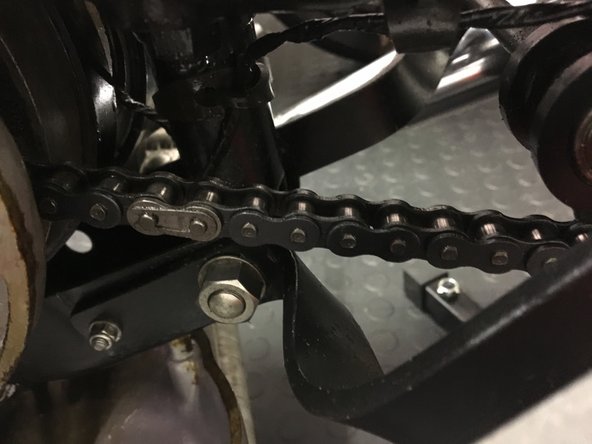
Remove the link from the rear chain and move it clear of the gearbox sprocket.
-
Drain the oil from the gearbox.
-
-
Deze stap is niet vertaald. Help het te vertalen
-
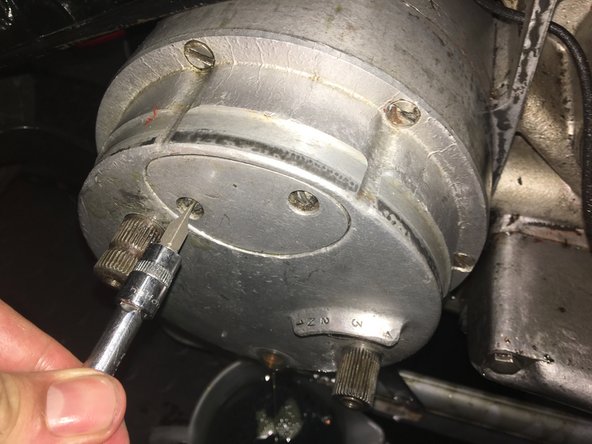
Undo the four screws holding the right side cover on and remove it.
-
Undo the two screws holding the inspection cover on and remove it.
-
-
Deze stap is niet vertaald. Help het te vertalen
-
Slacken off the clutch cable completely at the handlebar end and release it from the clutch lever.
-
Push the cable through to release it at the gearbox end.
-
Look in through the gearbox inspection hole and release the cable from the operating fork.
-
Withdraw the clutch cable from the gearbox and put it to one side.
-
-
Deze stap is niet vertaald. Help het te vertalen
-
Remove the two barrel bolts from the gearbox retaining bands.
-
Remove the two nuts holding the tensioner in place.
-
Withdraw the tensioner and the two spacers either side of the gearbox mounting tab.
-
-
Deze stap is niet vertaald. Help het te vertalen
-
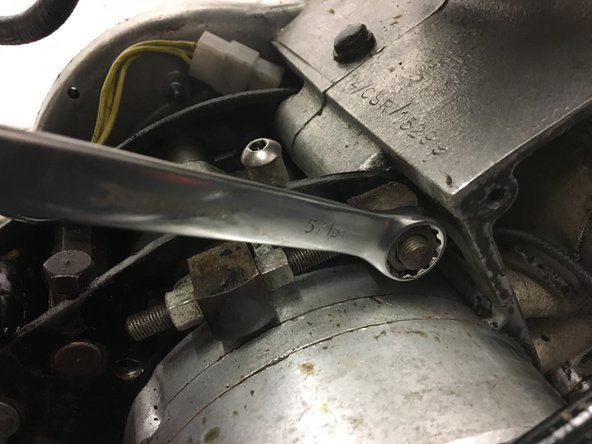
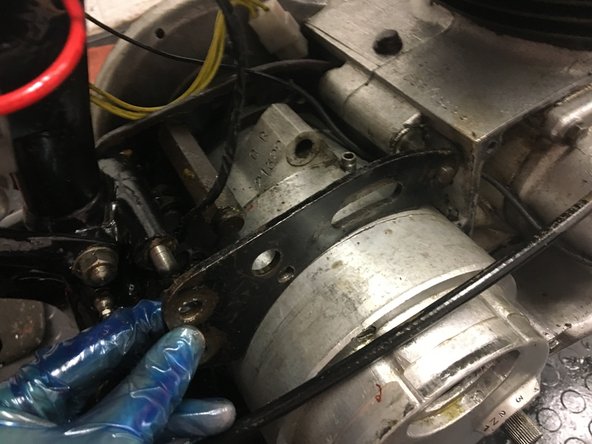
Remove the two nuts at the rear of the mounting plate.
-
Lift the mounting plate away.
-
-
Deze stap is niet vertaald. Help het te vertalen
-
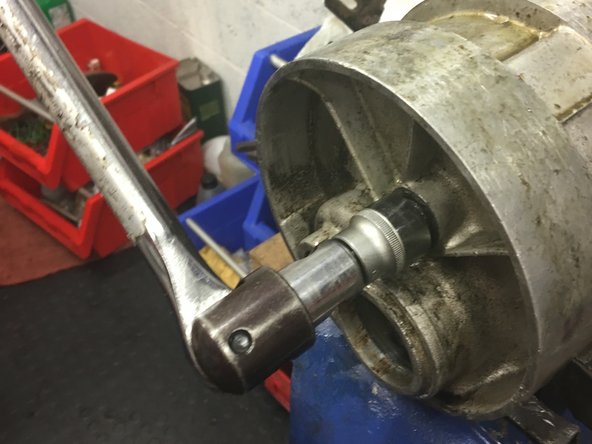
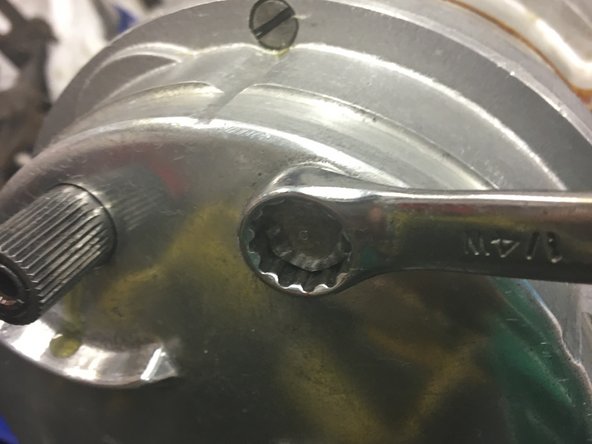
Bend down the tab washer securing the large sprocket nut.
-
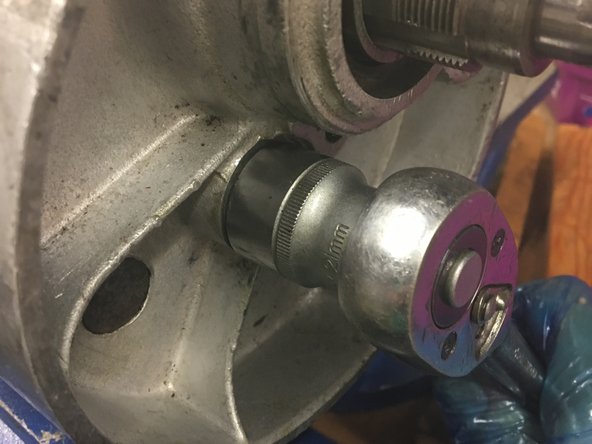
Undo the nut with a deep 38mm socket and a power bar.
-
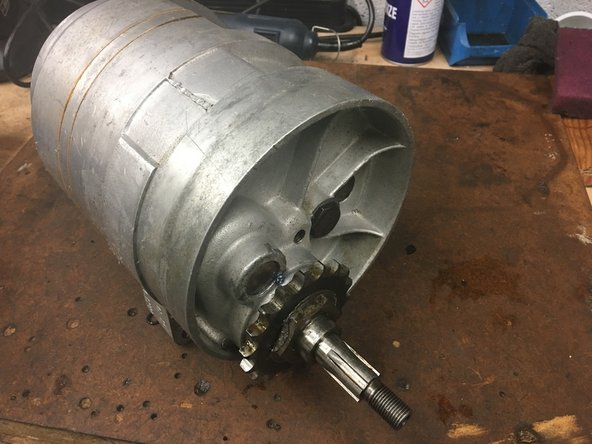
Remove the sprocket from the output shaft.
-
-
Deze stap is niet vertaald. Help het te vertalen
-
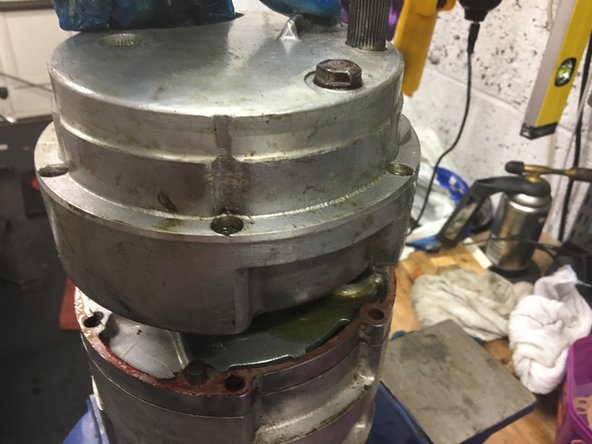
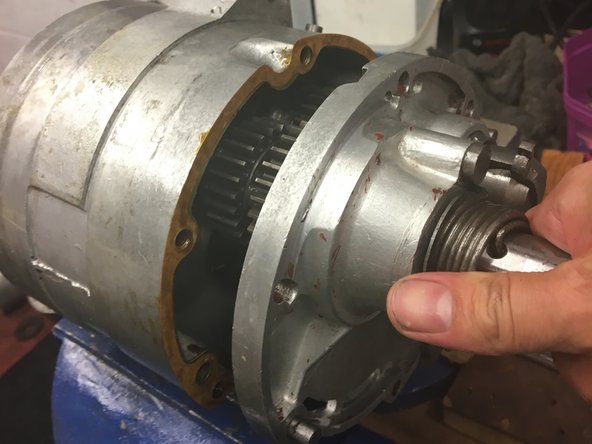
Undo the six screws holding the gearbox together.
-
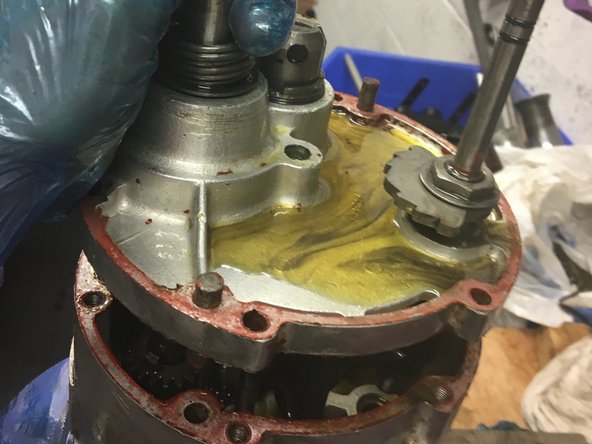
Lift off the gearbox end cover.
-
Lift out the gearbox centre web complete with the gear cluster.
-
Retrieve the two selector forks from the gear cluster (otherwise they'll fall off).
-
Retrieve the detent plunger and spring from the main casing (otherwise it will fall out later).
-
-
-
Deze stap is niet vertaald. Help het te vertalen
-
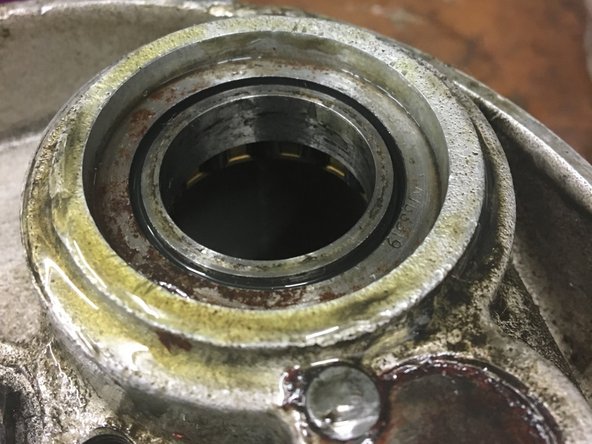
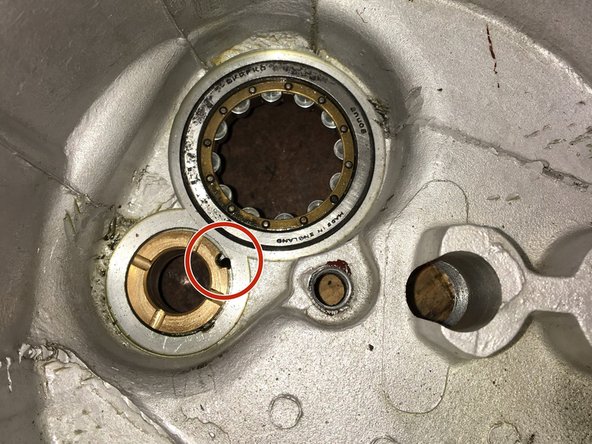
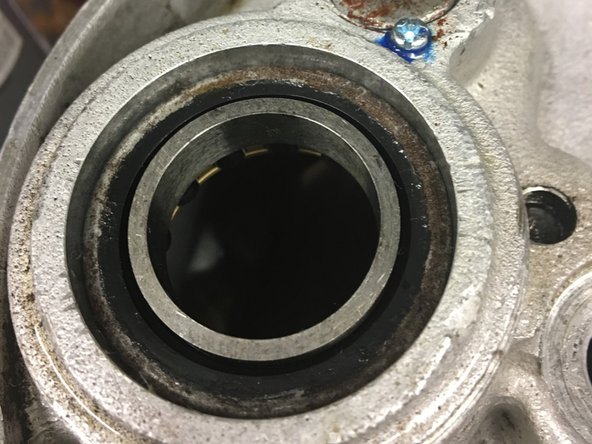
Check the large output bearing for signs of corrosion or roughness. If in doubt, it is a good idea to replace it. Note that it is a special part and is very expensive.
-
Check the output seal for signs of oil leakage.
-
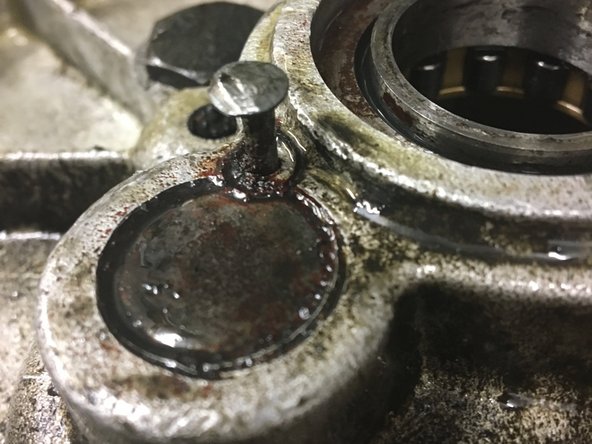
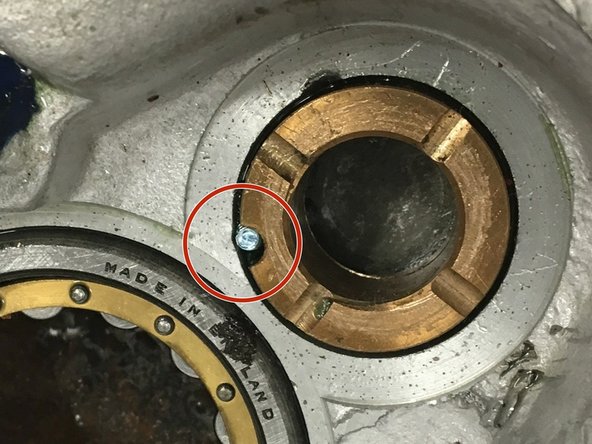
Check the selector pivot shaft is secure. It can work loose and cause oil to leak from the end of the casing.
-
Check the two steel plugs are secure and oil tight. Drift them out if in any doubt.
-
-
Deze stap is niet vertaald. Help het te vertalen
-
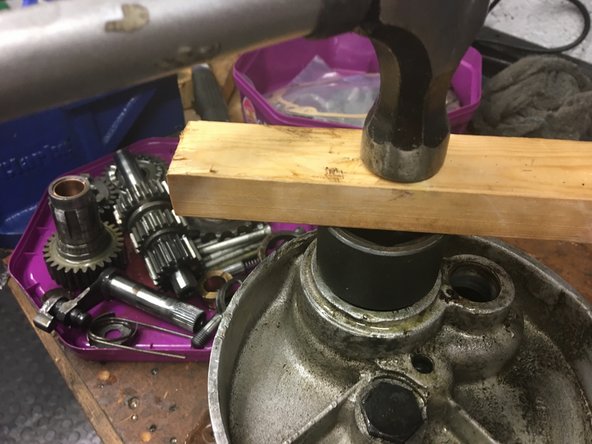
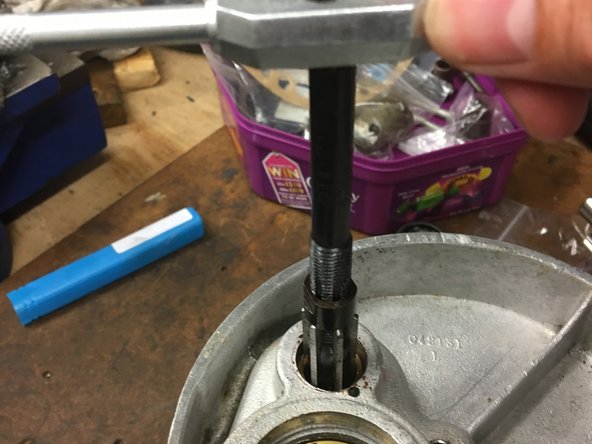
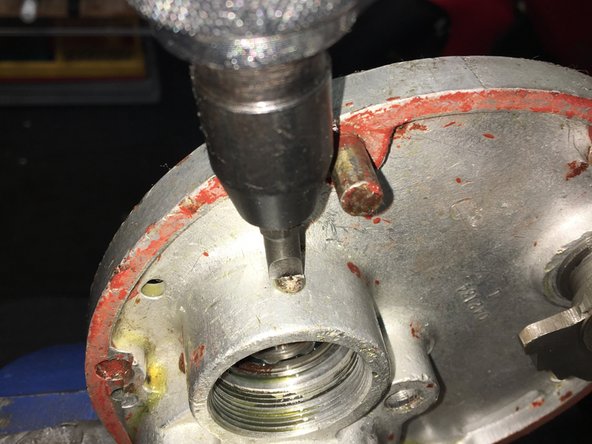
Gently tap out the main oil seal together with the metal spacer using a suitably-sized socket or drift.
-
If you plan to replace the main output bearing, you can also tap this out with a socket or drift; it should come out easily.
-
Drift out the steel plug covering the layshaft bush and drift the bearing out (if it hasn't fallen out already).
-
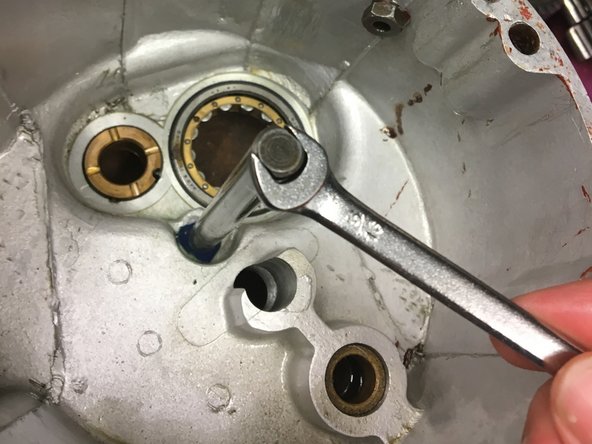
Unscrew the gear selector pivot shaft
-
Unscrew the detent plunger housing bolt.
-
There's no need to remove the gear selector bush, as it's unlikely to be worn.
-
Wash the casing out with paraffin or degreaser.
-
-
Deze stap is niet vertaald. Help het te vertalen
-
Remove all traces of old gasket or sealant form the casing face.
-
Pop the casing in an oven at approx 150ºC. Put the main bearing and layshaft bush in the freezer.
-
Once at the correct temperature, the bearing and bush should both drop into the casing (or go in with a light tap).
-
Put some thread lock onto the thread of the selector pivot shaft and screw it in firmly.
-
Don't put the plunger bolt in yet; that comes later.
-
-
Deze stap is niet vertaald. Help het te vertalen
-
If you fitted a new layshaft bush, check the size. It should be reamed to 0.6255-0.6260".
-
-
Deze stap is niet vertaald. Help het te vertalen
-
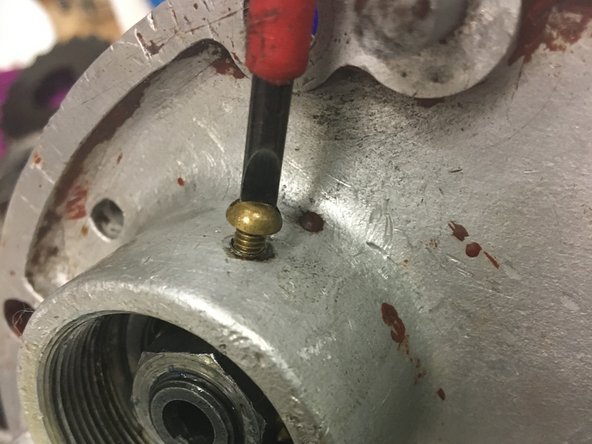
Tap the blanking plug home with a little Loctite 603 to hold it in place.
-
If your casing has a hole next to the layshaft bush, an M3x19mm screw appears to fit perfectly. Use some Loctite 603 to hold it in place.
-
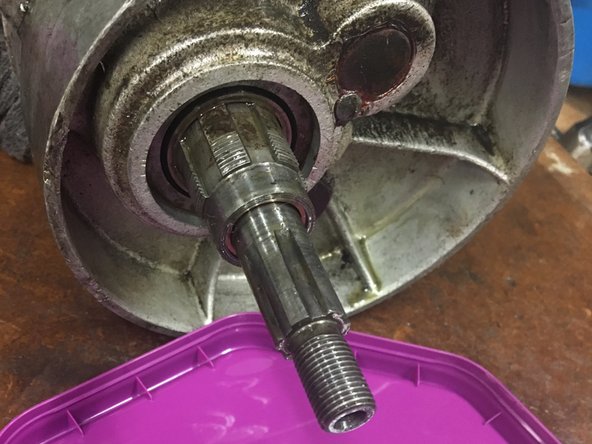
Fit the metal spacer (larger diameter inwards) into the oil seal (metal side outwards) and tap the seal into the casing. When fully home, it should sit ~4mm in from the outer surface i.e. do not leave it flush, otherwise it will bind on the sprocket.
-
At this point, it is a good idea to test fit the sleeve gear and outer sprocket to check that everything turns smoothly.
-
-
Deze stap is niet vertaald. Help het te vertalen
-
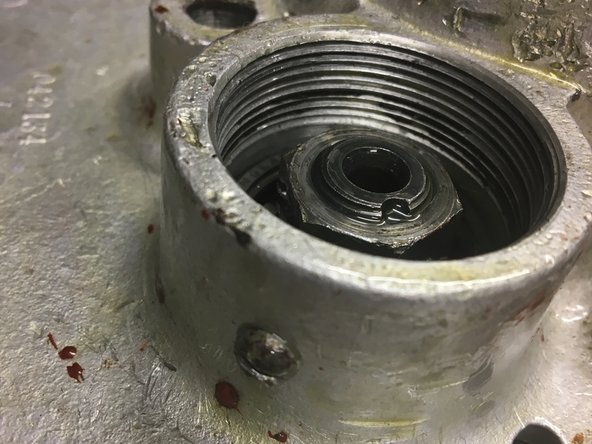
The clutch actuator is held in place with a threaded ring. Ideally, you would use a C-spanner to remove it, but access is so restricted that you will probably need to use a drift and hammer...
-
Now you can undo the nut on the end of the mainshaft.
-
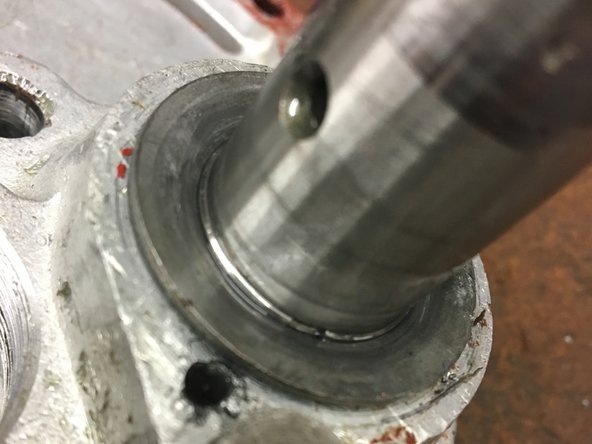
There should be a pin or screw to align the clutch actuator. You will need to remove it before you can get the mainshaft bearing out. If a screw has been used instead of a pin, an impact screwdriver might help to get it out.
-
Now you can drive out the mainshaft bearing. It is worth replacing this bearing as a matter of course as it is relatively cheap.
-
-
Deze stap is niet vertaald. Help het te vertalen
-
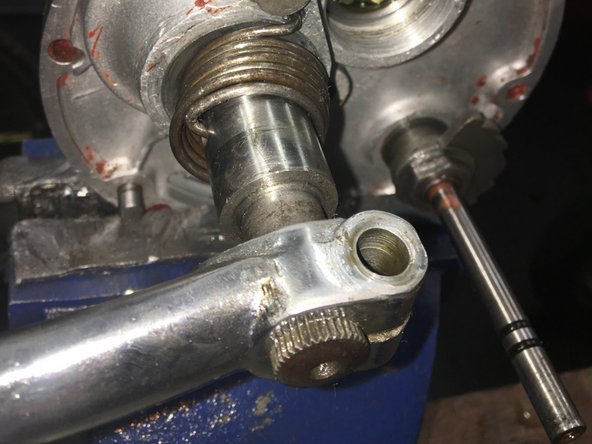
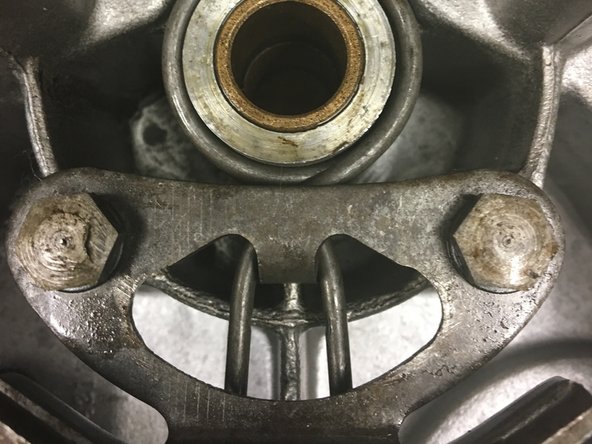
Use a pair of long-nosed pliers to remove the kickstart spring.
-
When the tension is released, the pawl will pop off the end of the shaft.
-
Note the washer and circlip arrangement under the spring (if fitted). This is a modification on later gearboxes to prevent premature wear of the layshaft bearing.
-
-
Deze stap is niet vertaald. Help het te vertalen
-
Remove all traces of gasket or sealant from the centre web.
-
Check the kickstart mechanism and bushes for wear and damage, replacing as required.
-
Fit the kickstart return spring using a pair of long-nosed pliers, noting the washer underneath the spring (if fitted). Use a pair of pliers to make sure the spring is fully engaged in the hole in the shaft.
-
Don't forget to fit the coil spring on the gearbox side.
-
Temporarily fit the kickstart and rotate the shaft by hand more than 90 degrees to tension the return spring.
-
Fit the kickstart pawl, then release the kickstart so that the return spring is left tensioned by approx. 90º. It takes a few goes to get it right.
-
-
Deze stap is niet vertaald. Help het te vertalen
-
The gearbox cluster is pretty straightforward and almost impossible to assemble incorrectly.
-
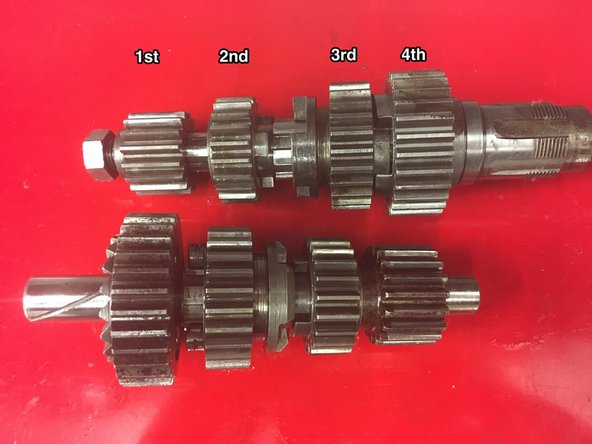
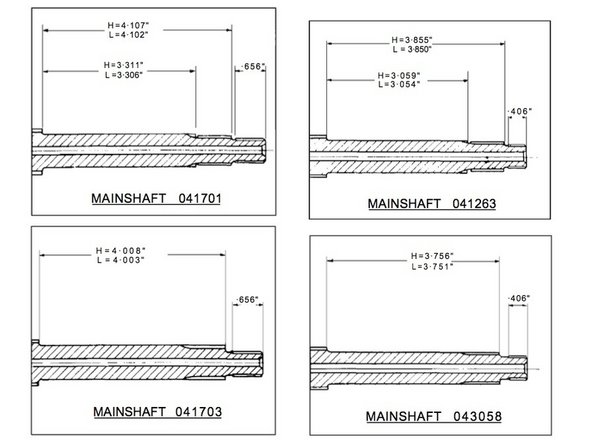
There are four different types of mainshaft. Make sure you have the correct one for your bike, otherwise the clutch won't fit.
-
-
Deze stap is niet vertaald. Help het te vertalen
-
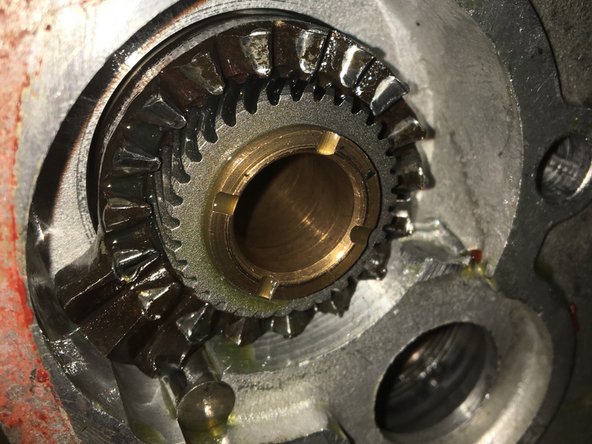
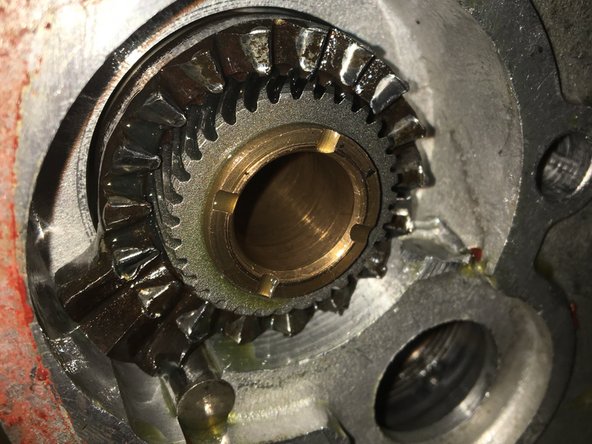
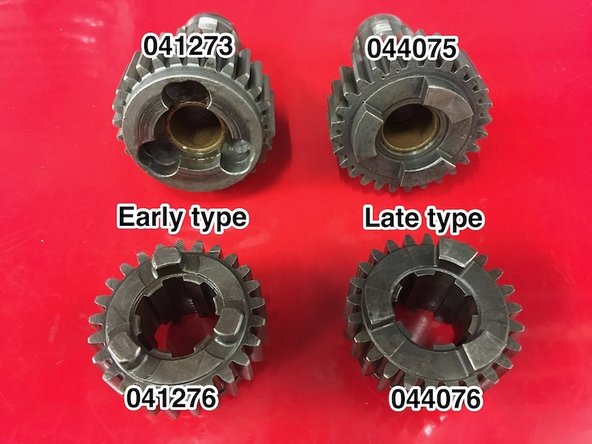
The output 4th gear ("sleeve gear") can suffer from wear. Check the exposed bearing track carefully and the inner bushes. If the inner bushes are worn, they can be replaced, but if the bearing track is worn or pitted, then the gear is scrap.
-
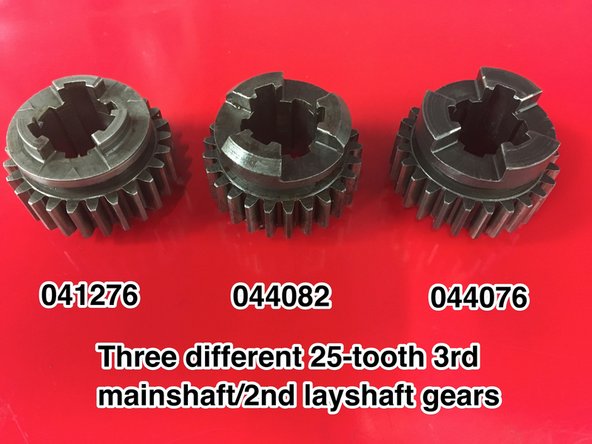
The other gears should be in usable condition (unless the gearbox has been run with wet oil). Check the case hardening for pitting and the bushes for wear.
-
-
Deze stap is niet vertaald. Help het te vertalen
-
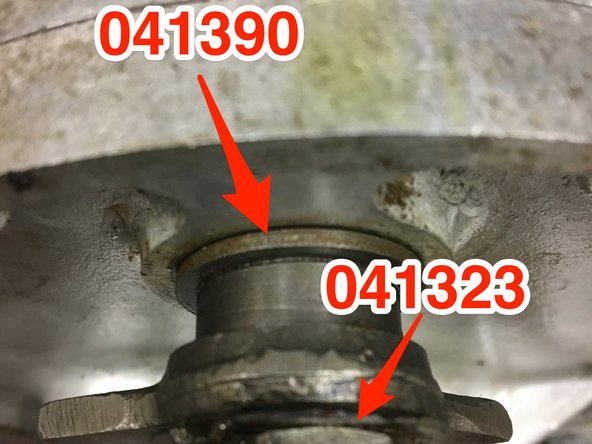
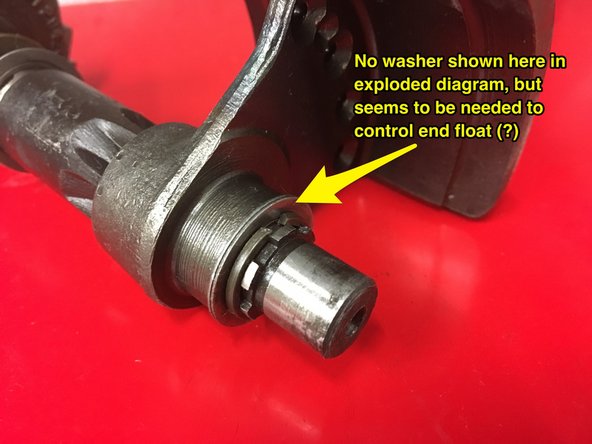
Check for endplay - there should be thrust washers on either side of the centre web as shown in the photos.
-
There may also be a washer under the circlip that hold the selector cam on. This isn't shown in the gearbox diagram, but might be necessary to control the end float.
-
-
Deze stap is niet vertaald. Help het te vertalen
-
Fit a new mainshaft bearing.
-
Fit first and second gear to the mainshaft, fit the mainshaft into the bearing and do up the the nut very tight.
-
Fit the clutch actuator locating pin (or screw).
-
Check the pivot pin through the clutch actuating lever is secure.
-
Fit the clutch actuator, aligning it with the locating pin in the housing and not forgetting the 3/8" ball underneath. Add a dab of grease to the ball, as the actuator sits above the gearbox oil level.
-
Do up the clutch actuator retaining ring. It is difficult to get it tight using a C-spanner.
-
-
Deze stap is niet vertaald. Help het te vertalen
-
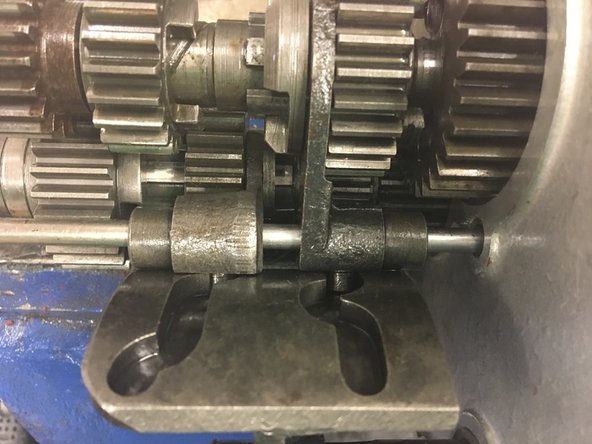
Assemble the gear cluster as shown.
-
Fit the gear selector forks as shown and make sure they are engaged with the selector.
-
-
Deze stap is niet vertaald. Help het te vertalen
-
Paint a thin layer of Wellseal or similar non-setting sealant onto the mating surfaces. You can also fit a paper gasket, though it's not absolutely necessary.
-
Fit the sleeve gear into the main bearing.
-
Fit the two halves together. This will require a bit of jiggling to align the various shafts; whatever you do, don't use force.
-
At this point, it's a good idea to check that the shafts rotate freely and the gear selector works .
-
-
Deze stap is niet vertaald. Help het te vertalen
-
Check the kickstart and gear change bushings, replace as necessary.
-
Fit a new gear change o-ring seal into the outer case.
-
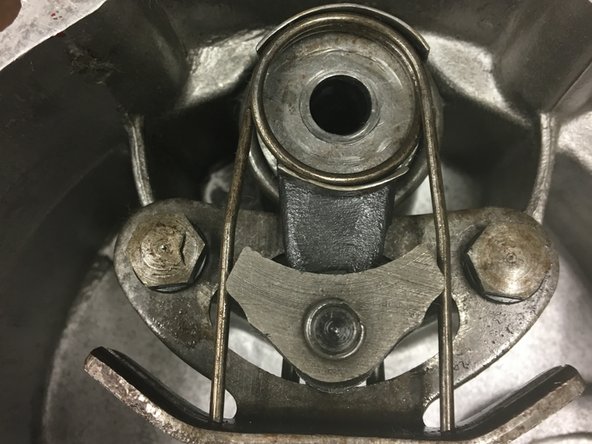
Check the main gearchange spring is in good order. The earlier type is prone to cracking and failure. The later "cross over" type of spring shown in the picture fixes these issues.
-
Now fit the cup washer and pawl spring as shown. This can be tricky to get right!
-
-
Deze stap is niet vertaald. Help het te vertalen
-
Fit new o-rings to the kickstart and gear indicator shafts.
-
Clear all traces of gasket or sealant from the gasket surfaces.
-
Paint a thin layer of Wellseal or similar non-setting sealant onto the gasket surfaces. You can also fit a paper gasket, though it's not absolutely necessary.
-
Refit the gearbox cover, taking care to make sure that the gear change pawl spring stays in place.
-
Tighten the six retaining screws evenly.
-
-
Deze stap is niet vertaald. Help het te vertalen
-
Inspect the detent spring components. The spring should be straight and the detent plunger should have a pointed (not rounded) top.
-
Assemble the spring and plunger into the retaining bolt and screw the assembly into the end of the gearbox.
-
Refit the oil drain plug.
-
-
Deze stap is niet vertaald. Help het te vertalen
-
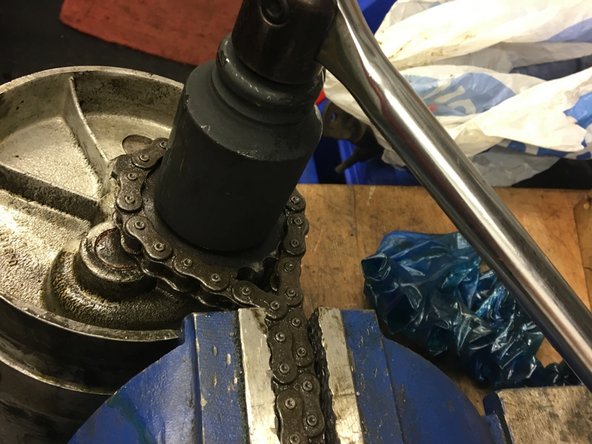
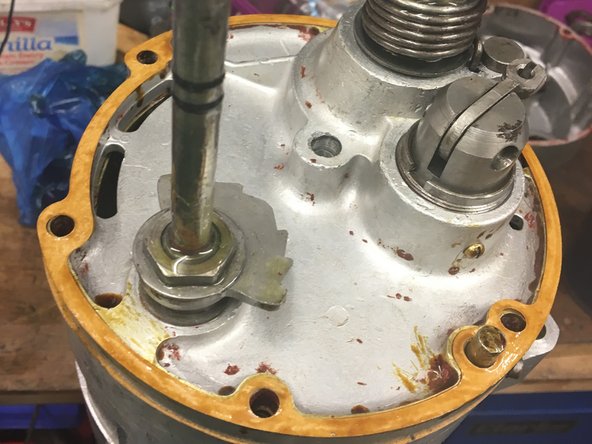
Fit the output sprocket, tab washer and nut.
-
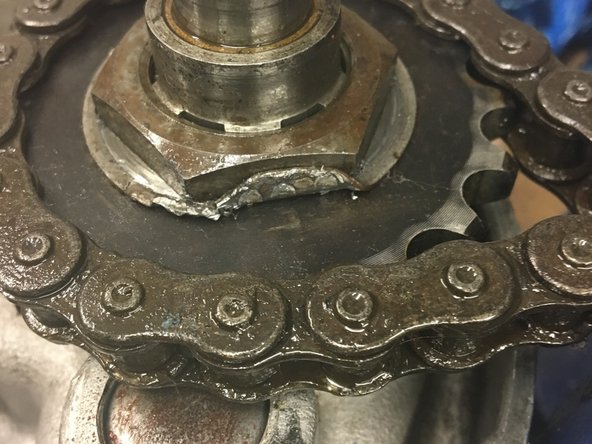
Use an old chain to secure the sprocket in a vice.
-
Tighten the nut very tight with a deep 38mm socket.
-
Bend up the tab washer.
-


Annuleren: ik heb deze handleiding niet afgemaakt.
3 andere personen hebben deze handleiding voltooid.
7 opmerkingen
Good job Paul, thanks for the guide.
Awesome, detailed guide! Fantastic work.
Afternoon, I was wondering if you could help please. I’ve recently acquired an AJS model 14 and I have an issue, when I kick it over there’s no engagement at all, kickstart goes down with no resistance other than what’s in the spring, engine doesn’t turn over, and is the same when I try to select any gear, nothing, any pointers that could help please??
many thanks,
chris
Hi Chris, you need to take off the primary drive cover (left hand side) and have a look. It could be clutch slip or a number of other things. If you have Facebook, probably best to ask a question in the AJS & Matchless lightweight singles owners group. Good luck!
Thanks very much Paul !