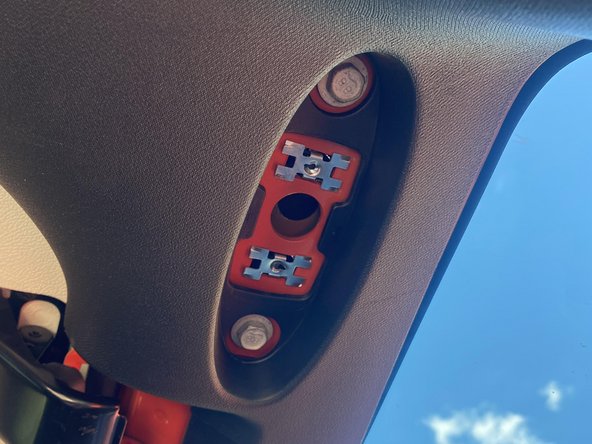
Ga door naar hoofdinhoud

2013-2018 Jeep Wrangler Sun Visor Replacement

Wat je nodig hebt

  1. 2013-2018 Jeep Wrangler Sun Visor Replacement, Sun Visor: stap 1, afbeelding 1 van 1
    • Lower the old sun visor to the lowest position.

  2. 2013-2018 Jeep Wrangler Sun Visor Replacement: stap 2, afbeelding 1 van 2 2013-2018 Jeep Wrangler Sun Visor Replacement: stap 2, afbeelding 2 van 2
    • Locate the screw that secures the sun visor to the mounting bracket.

    • This screw is sometimes covered by a small plastic bracket.

    • Remove the plastic cover using a flathead screwdriver or trim-removing tool

  3. 2013-2018 Jeep Wrangler Sun Visor Replacement: stap 3, afbeelding 1 van 2 2013-2018 Jeep Wrangler Sun Visor Replacement: stap 3, afbeelding 2 van 2
    • Use a Torx T20 or T25 to remove the 12 mm screw that attaches the sun visor to the bracket.

  4. 2013-2018 Jeep Wrangler Sun Visor Replacement: stap 4, afbeelding 1 van 2 2013-2018 Jeep Wrangler Sun Visor Replacement: stap 4, afbeelding 2 van 2
    • Slide the old sun visor off the mounting bracket.

    • Keep the old sun visor and any hardware in case it's needed for the replacement.

  5. 2013-2018 Jeep Wrangler Sun Visor Replacement: stap 5, afbeelding 1 van 2 2013-2018 Jeep Wrangler Sun Visor Replacement: stap 5, afbeelding 2 van 2
    • Slide the new sun visor onto the mounting bracket, aligning the holes for the screws.

  6. 2013-2018 Jeep Wrangler Sun Visor Replacement: stap 6, afbeelding 1 van 3 2013-2018 Jeep Wrangler Sun Visor Replacement: stap 6, afbeelding 2 van 3 2013-2018 Jeep Wrangler Sun Visor Replacement: stap 6, afbeelding 3 van 3
    • Insert the screw into the mounting bracket and tighten it with the Torx T25 screwdriver.

    • Make sure it's snug but not too tight.

    • Tightening the screw too tight might damage the plastic.

    • If your sun visor had a plastic cover concealing the screw, put it back in place.

    • Test the new sun visor by moving it into different positions to make sure it functions correctly.

Conclusie

To reassemble your device, follow these instructions in reverse order.

Piper Klein

Lid sinds: 09/27/23

133 Reputatie

1 Handleiding geschreven

Team

0 opmerkingen

Voeg opmerking toe

Weergavestatistieken:

Afgelopen 24 uren: 2

Afgelopen 7 dagen: 9

Afgelopen 30 dagen: 49

Altijd: 170