Deze vertaling geeft mogelijk niet de meest recente updates van de bronhandleiding weer. Help ons met het updaten van de vertaling of bekijk de bronhandleiding.
Inleiding
Ververs de olie van je Suzuki SV650 1999-2002 elke 6400 kilometer (4000 mijl) of na zes maanden.
Wat je nodig hebt
-
-
Zoek de zeshoekige (hex) aftapplug met een doorsnee van 14 mm aan de onderkant van je motor.
-
Plaats een olieopvangpan onder de aftapplug, zodat je alle olie die uit je motor komt opvangt.
-
-
-
Gebruik een 14 mm-moersleutel om de aftapplug los te draaien. Draai je sleutel tegen de klok in tot je de plug met je hand verder los kunt draaien.
-
Verwijder de plug met je hand en neem de tijd om de olie uit je motor te laten lopen.
-
-
Deze stap is niet vertaald. Help het te vertalen
-
Clean the oil drain plug with a towel or rag.
-
Remove the old gasket from the plug. If your drain plug gasket did not come off with the drain plug, pry it off the oil pan with a flat head screw driver.
-
Slide a new gasket over the threads.
-
-
Deze stap is niet vertaald. Help het te vertalen
-
Once the draining oil has slowed to a drip, wipe off the area around the oil drain and reinsert the oil drain plug.
-
Twist the oil drain plug into place using your hand, then finish tightening it clockwise with the box end wrench.
-
-
-
Deze stap is niet vertaald. Help het te vertalen
-
Locate the oil filter under the bike and slide the oil drain pan underneath it to catch draining oil.
-
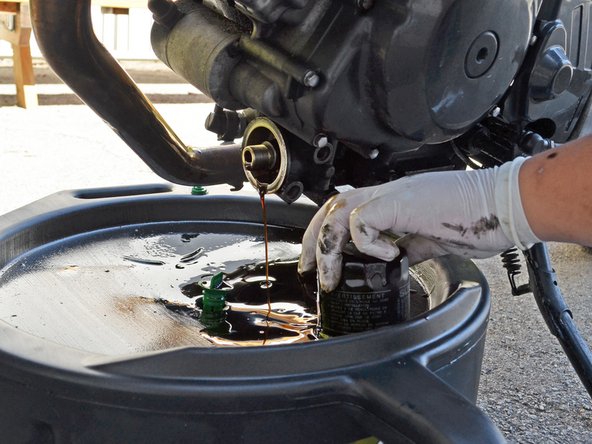
Remove the oil filter by twisting it counter-clockwise.
-
Place the old oil filter down on the oil drain pan and allow oil to drain from the engine into the oil drain pan.
-
-
Deze stap is niet vertaald. Help het te vertalen
-
Dip a clean, gloved finger into a bottle of new oil.
-
Spread a thin layer of clean oil around the rubber gasket of the new oil filter.
-
Clean the area around the old oil filter with a rag or towel, then place the filter over the filter threads and use your hand to tighten it.
-
-
Deze stap is niet vertaald. Help het te vertalen
-
Locate the oil filler cap on top of the clutch cover.
-
Remove the oil drain cap by twisting it counter-clockwise.
-
-
Deze stap is niet vertaald. Help het te vertalen
-
Insert a funnel into the oil filler hole to prevent spills.
-
Pour 3 quarts of 10W-40 motorcycle oil into the engine. Use one hand to stabilize the funnel to prevent spills.
-
-
Deze stap is niet vertaald. Help het te vertalen
-
Tilt the motorcycle up off of its kickstand until it is vertical so that you can check the oil level through the sighting glass.
-
The oil level should read somewhere between the "Low" and "Full" marks.
-
After starting the motorcycle and rechecking the oil level, you may add or remove oil as you see fit, then place the oil filler cap back over the oil filler hole. Turn the cap clockwise until it is snug.
-
-
Deze stap is niet vertaald. Help het te vertalen
-
Start the bike and check it for leaks. If there are leaks, shut the bike off and determine if the drain plug or filter need to be tightened, or if a part has been damaged.
-
After running the engine for a few minutes, let it cool down for at least an hour and re-check the oil level. If the oil level completely fills the oil level view port you will need to drain some of the oil. If the oil level is below the bottom notch you will need to add oil.
-
Allow 12-24 hours for all the oil to drain out of your old oil filter.
-
Take your old oil and filter to a recycling facility. Most auto parts stores and repair shops accept these at no charge. In addition, some cities and/or counties have a service where they will collect used oil and filters from your home. For more information, see the American Petroleum Institute's web page on used motor oil collection and recycling.
-


Annuleren: ik heb deze handleiding niet afgemaakt.
9 andere personen hebben deze handleiding voltooid.
Met dank aan deze vertalers:
37%


Deze vertalers helpen ons de wereld te repareren! Wil je bijdragen?
Begin met vertalen ›

4 opmerkingen
In the first image that identifies the drain plug with a red circle is wrong. in one of the later images i see you remove another bolt than the one you circled. the question is what is that first bolt that you have circled? i ask because i drained whatever fluid it was holding back but it was definitely not all the oil in the engine. i have a compounded issue of a rounded drain plug so i can't drain all the oil out. sadly i have to get a replacement plug before extracting the stripped one. :-(
Just wanted to point out the issue of the plug ID in your image and maybe you know what that bolt actually is for.
Thank for doing this write up.
Filler cap should also be removed first to aid draining, or at least once sump plug is out.
Not just when ready to refill.