Ga door naar hoofdinhoud

超薄版PS3光驱置换

Wat je nodig hebt

  1. 超薄版PS3光驱置换, 供电变压器组件: stap 1, afbeelding 1 van 2 超薄版PS3光驱置换, 供电变压器组件: stap 1, afbeelding 2 van 2
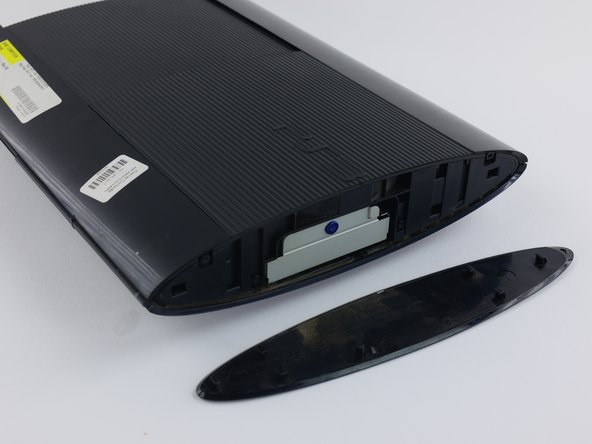
    • 向后推硬盘盒的盖子来移除它

    • 盖子位于设备的右侧

  2. 超薄版PS3光驱置换: stap 2, afbeelding 1 van 2 超薄版PS3光驱置换: stap 2, afbeelding 2 van 2
    • 使用T-8 六角螺丝刀拧下3颗黑色9.8毫米长的螺丝

    • 使用飞利浦#1螺丝刀拧下蓝色7.9毫米长的螺丝

  3. 超薄版PS3光驱置换: stap 3, afbeelding 1 van 2 超薄版PS3光驱置换: stap 3, afbeelding 2 van 2
    • 拉出硬盘盒

    • 卸下的硬盘盒要放在安全的地方以避免数据损坏

  4. 超薄版PS3光驱置换: stap 4, afbeelding 1 van 2 超薄版PS3光驱置换: stap 4, afbeelding 2 van 2
    • 在设备底部,使用金属的小撬棍,撬下3个橡胶防滑底座

    • 使用十字螺丝刀拧下4个长度为36.3毫米的螺丝

    • 其中一颗螺丝隐藏在保修贴纸下面,你可以撕掉它或用螺丝刀穿破它。

  5. 超薄版PS3光驱置换: stap 5, afbeelding 1 van 2 超薄版PS3光驱置换: stap 5, afbeelding 2 van 2
    • 在设备的正面的最右侧,使用撬棍工具插入前盖板与设备之间的缝隙,撬开其塑料卡扣

    • 第二个卡扣位置如图所示

    • 使用开机片向左滑动,撬开所有的卡扣

    • 这是此维修指南中最难的步骤,如果你打不开这些卡扣,你可以尝试大力出奇迹,注意,你会很容易的损坏他们,您自行承担风险。

  6. 超薄版PS3光驱置换: stap 6, afbeelding 1 van 1
    • 按压右侧并向左推动可以移除后面板

  7. 超薄版PS3光驱置换: stap 7, afbeelding 1 van 3 超薄版PS3光驱置换: stap 7, afbeelding 2 van 3 超薄版PS3光驱置换: stap 7, afbeelding 3 van 3
    • 使用十字螺丝刀拧下5颗长度为20.8毫米的银色螺丝

    • 在光驱旁边,使用六角螺丝刀拧下2颗长度为9.9毫米的螺丝

    • 移除上盖

  8. 超薄版PS3光驱置换: stap 8, afbeelding 1 van 3 超薄版PS3光驱置换: stap 8, afbeelding 2 van 3 超薄版PS3光驱置换: stap 8, afbeelding 3 van 3
    • 向旁边移开光驱可以看见一颗长度为8.8毫米的银色螺丝

    • 使用十字螺丝刀拧下它

  9. 超薄版PS3光驱置换: stap 9, afbeelding 1 van 3 超薄版PS3光驱置换: stap 9, afbeelding 2 van 3 超薄版PS3光驱置换: stap 9, afbeelding 3 van 3
    • 拔出白色的插头

    • 注意:拔时要抓塑料的连接头,而不是线

    • 卸下电源组件。(竖直向上提起电源,可能需要一点点力气)

  10. 超薄版PS3光驱置换, 光驱: stap 10, afbeelding 1 van 3 超薄版PS3光驱置换, 光驱: stap 10, afbeelding 2 van 3 超薄版PS3光驱置换, 光驱: stap 10, afbeelding 3 van 3
    • 向上提分离白色连接线,使其与底座分离

    • 抓住黑色卡片,拔出黑蓝连接线

  11. 超薄版PS3光驱置换: stap 11, afbeelding 1 van 3 超薄版PS3光驱置换: stap 11, afbeelding 2 van 3 超薄版PS3光驱置换: stap 11, afbeelding 3 van 3
    • 180度旋转设备

    • 从底座上拔出黑白连接线

    • 卸下光驱

Conclusie

倒序观看此指南,便可组装回你的设备

12 andere personen hebben deze handleiding voltooid.

Met dank aan deze vertalers:

en zh

100%

James HJH helpt ons de wereld te herstellen! Wil je bijdragen?
Begin met vertalen ›

Joseph O'Connor

Lid sinds: 04/14/16

2.383 Reputatie

5 handleidingen geschreven

Team

Cal Poly, Team 34-13, Maness Spring 2016 Lid van Cal Poly, Team 34-13, Maness Spring 2016

CPSU-MANESS-S16S34G13

4 Leden

21 handleidingen geschreven

5 opmerkingen

It might be useful to have pictures of the super slim too since it’s in the title. I’m referring to CECH-3xxx / 4xxx mostly because the shell and disassembly looks a bit different. Great guide all the same. Thanks!

Sam Roney - Antwoord

Hi i have a Question

I change the Optical Drive on my PS 3 Super Slim Named KEM850 PHA KES850 .But the new drive only play DVD not Blueray Game or Movie

An update was made without drive on board connected .can be this the problem. how can i fix them

Please Help

s

Karl-Heinz Schumacher - Antwoord

How to pair a new optical drive with the old motherboard?

Tiago - Antwoord

PS3s and PS4s have daughterboards on their disc drives. Put the daughterboard of your old disc drive on the new one and it may work.

Joe Drew -

I am replacing the optical drive in my console. But didn't note where the drive ribbon was positioned!? Every video I have found, they just pop right in...my original and replacement drives, have larger receptacles than the ribbon it self. There are at least 5 pins, that don't have (potentially) anything connecting them, to the ribbon. I don't want to randomly place the ribbon in one of the possible (7?) positions and fry something in the process...so where do I connect the smaller ribbon?!

Robert Shelton - Antwoord

Voeg opmerking toe

Weergavestatistieken:

Afgelopen 24 uren: 3

Afgelopen 7 dagen: 43

Afgelopen 30 dagen: 284

Altijd: 18,376