Inleiding
This repair guide will show you how to replace the Sony WF-1000XM4 earbuds battery. In this guide, we will replace the battery of the left earbud, you can follow this guide for the right earbud too, the steps are the same as the earbuds are perfectly symmetrical.
Replacing the earbud battery can solve the following issues:
- Earbuds become hot while in charging case
- Earbuds won’t charge to 100%
- Charging case flashing red and one earbud is excessively hot
- At least one earbud has short battery life
There have been reports of some earbud explosion with this device.
Therefore, exercise caution and ensure that the earbud you wish to open is fully discharged before proceeding with this guide.
Disclaimer: Neither iFixit nor the author of this guide shall be held liable for any damages related to this tutorial or its publication.
Wat je nodig hebt
-
-
Using a powerful hair dryer or a heat gun, heat the earbud for about ten seconds to soften the glue that sticks both parts of the earbud together.
-
This is a difficult step because you need to heat the earbud enough to soften the glue inside the earbud without burning the plastic of the earbud’s shell.
-
-
Gereedschap gebruikt in deze stap:Jimmy$7.95
-
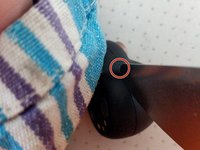
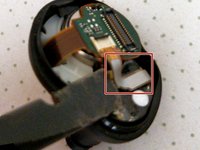
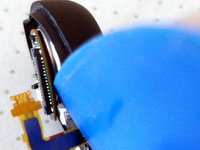
Take the thinnest possible tool, and slide it into the gap between the two parts of the earbud’s shell.
-
Then, start to lever the two halves apart at the point circled in the picture.
-
When the two parts of the earbud’s shell start to separate, continue to separate them by levering all around the shell.
-
-
-
-
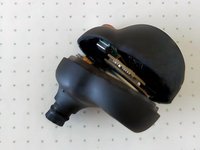
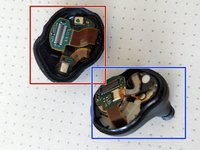
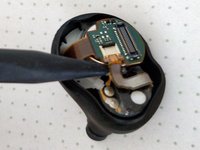
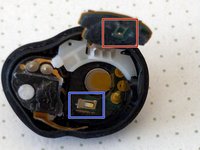
Once the earbud is open, you will see two tiny circuit boards linked by a board-to-board connector.
-
Using an Opening Pick, unplug the two circuit boards by levering very gently between them.
-
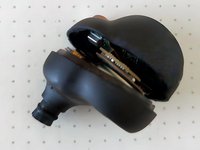
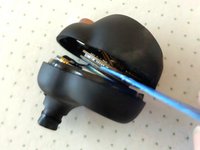
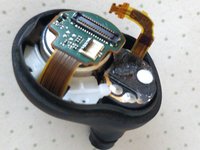
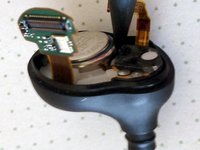
Set the upper part of the earbud shell aside in order to reassemble it later.
-
The upper part is highlighted in red in the third picture.
-
The lower part is highlighted in dark blue in the third picture.
-
-
-
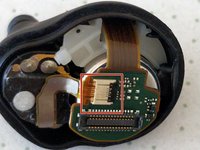
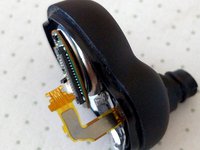
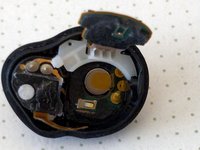
Locate the ZIF connector on the lower part circuit board.
-
Lift the flap of the ZIF connector using an Opening Pick or another thinner plastic tool.
-
-
-
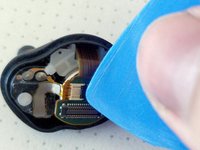
Using an Opening Pick or a spudger, gently unstick the glued cable.
-
Then, gently unplug this cable.
-
-
-
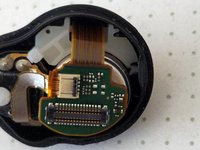
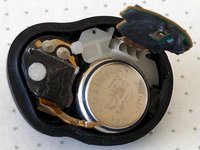
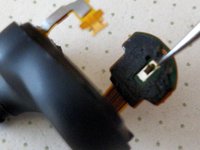
Find the junction between the electronic circuit and the earbud battery just below it.
-
Using an Opening Pick or a very thin plastic tool, very gently unstick the circuit board from the battery by inserting the Opening Pick between the circuit board and the battery.
-
Once the circuit board is unstuck from the battery, lift it up as shown on the third picture to have enough space to remove the battery.
-
-
-
Remove the battery by lifting it up using the point of a spudger as shown on the first picture.
-
-
Gereedschap gebruikt in deze stap:Tweezers$4.99
-
Find the two metal contacts
-
One highlighted in red.
-
One highlighted in dark blue.
-
If the contacts were flattened during the battery removal, very carefully lift them up a bit with the point of tweezers so that they will make good contact with the new battery when you reassemble the earbud.
-
-
-
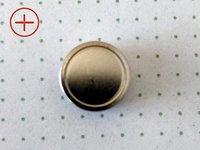
Install the new battery by placing it in the earbud, negative terminal up.
-
The first picture shows the positive side of the battery.
-
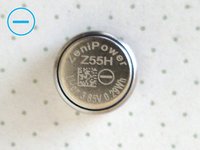
The second picture shows the negative side of the battery.
-
The third picture shows the new battery installed inside the earbud.
-


To reassemble your earbud, follow these instructions in reverse order from step 8, then glue the two parts of the earbud using E-8000 glue when resealing it.
E-8000 glue is a glue that remains transparent and doesn’t leave drying residues.
To reassemble your earbud, follow these instructions in reverse order from step 8, then glue the two parts of the earbud using E-8000 glue when resealing it.
E-8000 glue is a glue that remains transparent and doesn’t leave drying residues.
Annuleren: ik heb deze handleiding niet afgemaakt.
221 andere personen hebben deze handleiding voltooid.

98 opmerkingen
I needed to perform the reinitialization procedure to get the headphones to work together after, but apart from that it worked well!
Good point, thanks, I completely forgot to write a conclusion about this :-)
Hard reset the earbuds will reset battery stats stored inside the earbuds internal memory, it's essential for earbuds to works well with new batteries.
Brendan -
When replacing batteries in the XM4 it is essential to use 3.85v 75mAh batteries.
Unfortunately, some battery sellers are incorrectly indicating that 3.7v batteries can be used.
Thanks for the heads up. I just checked the batteries I got from Ebay and Indeed got sent Z55 instead of Z55H ( even though the listing said I was buying Z55H batteries.
I understand for the voltage but why couldnt you use a battery with more capacity? That seems like it would be an upgrade (if you could find some that fit obviously)