
Plan to fix overheating GPU in iMac: thermal pad or thermal paste?
Late 2014 2806 5k 27” iMac - I’m having the GPU spikes come and go depending upon application, flirting with 105ºC here and there.
I am using TG Pro to manage the fan boosting but it seems best fix longer term is to crack this puppy open and do a thorough cleaning internally and to address the somewhat known issue of poor thermal paste breakdown on these models.
I also was weighing the pros n’ cons of swapping the blade out with a OEM one from eBay and putting in a good capacity, zippy HDD.
My research has educated me on the extreme tediousness and propensity to crack the display with this endeavor as well as needing / not needing the OWC thermal sensor if installing a SSD. Anecdotes vary on this, but I figure why not add?
My eyeballs are spinning I’ve been going all over the place researching options. The advice I’m looking for is re: thermal paste replacement.
Dan the Lobster Man seems super helpful in his replies to people in search on this site and I’ve learned alot from his advice. One thing that stuck out was the mention of a thicker compound Apple used on the thermal off-loading during the initial build on these models. This brings me to a divide: 1) get more of this gunk which I think is similar to : K5 PRO viscous thermal paste (5.3 W/mK) 2) hope someone with the same model can *confirm* the spacing gap between the GPU / CPU and heatsink so I can have a thermal pad ready to go. Looking at Thermal Grizzly minus pads 8 for this (8.0 W/mK). -or- 3) just go with thermal paste if the components are close enough: also leaning towards Thermal Grizzly Kryonaut Extreme (14.2 W/mk) or regular Kryonaut (12.5 W/mk)- advice between these 2 would be welcome also.
Thanks y’all
Update (11/23/2020)
Hi Dan and future answer seekers - update...
My Sunday was an iMac cleaning arena and upgrade session. I split the Fusion, swapped the HDD for a SSD, replaced RAM to be matching pairs (I had purchased used with a weird mix o' RAM) and had a fistful of cotton swabs, hi octane electronic alchohol, and a shop vac.
It was a lengthy process, but I was very much triple-checking every move before proceeding. I followed a mix of the Heat Sink Replacement guide here on iFixit and also the HDD upgrade video over on OWC.
To any that are planing such an endeavor: I didn't find a service wedge would've been handy. I just used a microfiber and laid the iMac on its back on a clean surface, my desk, this let me rotate to sections as I needed to address them and not worry about screws falling down into the air intake lip. And reading glasses, and a articulating desk lamp. And needle nose pliers, needle nose vice grips, an exacto knife, 3M double sided sticky tape - automotive grade, electrical tape, calipers, soft fan art brush (to knock dust off while vacuuming), in addition to the regular Mac torx's, suctions, pizza cutter, etc.
About a mouse worth's of gunk stuck in the fins of the exhaust and general dust and particulates abound. I disassembled the fan to wipe down the shell interior and really go at it on the magnetized fan component (grody).
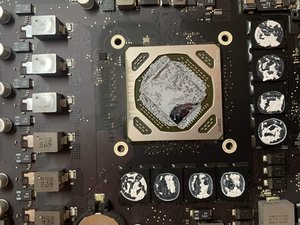
Then I came to the sancta sanctorum of the heatsink and it's mounting to the logic board and the GPU / CPU elements. Dry, cracked white paste. Thoroughly cleaned with mix of spudger, toothpick, cotton swabs, alchohol.
Used the Gelid pads, even though I also got some Kryonaut paste. But this was a tough part I hovered on for some time. The way the heatsink is designed, the CPU and GPU enters a somewhat recessed indentation of the heat sink so using the feeler gauge I purchased was a no-go. I could use the gauge on the VRAM as that was on the perimeter of the GPU heatsink area. I also did not understand how I could measure using card stock or any thing really.
Now that I am relaying this it occurs to me, I could have taken some modeling clay and made a little ball, place one on the CPU, one on the GPU, then dry fit - in which case when I then released the clay would be at a certain thickness, smushed to something that would give me info to run on. Oh well, Monday morning QB.
Ended up using 1mm on CPU, 1.5mm (1+0.5) on GPU and 2mm (1+1) on VRAM for my Late 2014 5K iMac. I came to these thicknesses by being able to see the VRAM gap and dry fit some filmed pads, but also starting with the 1mm on the CPU / GPU removing the film so the pad was ready, slight clayish 'tack'. Then I dry fit and then removed. The CPU came up, stuck to the pad on the heatsink while the GPU only had a faint smudge of the pad's criss-cross pattern on it, like a print. This told me the CPU pad was flush enough and the GPU needed a little height, so the 1mm for CPU, 1.5mm for GPU.
Going back is always quicker, so sealing it up went okay now I am on my first day of replacing software bits and seeing how the Mac is responding. Upgrade wise everything is going swell. Heat-wise, no so much. I've been opening windows, downloading Creative Cloud apps, setting app preferences, etc and have seen my TG Pro kick on several times and CPU's have spiked to above 80ºC several times, highest being 98º on a Core and 96º on CPU PECI and 69º on CPU Proximity. GPU Core highest 83º. I know this is just one day so far, but I expected lower operating temps doing the seemingly light things I've been doing.
*Also, when reassembling I put the new screen adhesive in place, but left the protective film on one side on so I could piece the screen back held with 9 sections of painter's tape in order to boot before sealing which was good b/c I had the temp sensor from OWC I put on the new SSD too high in the chasis adhered with the 3M tape. So I was able to see it not allowing the screen to be flush at the top of the Mac and easily correct.
Gross Build up…

Keeping screws organized…

Back of display, worrisome streaks

OG Apple Paste on GPU/VRAM
Is dit een goede vraag?


@magneticarrow - You didn't use thermal pads on the CPU or GPU chips did you?? You need paste on them. The gage was to only measure the gap on the GPU VRAM chips to the heat sink as they are the ones that get the pads (the last image in your update where the white gapping paste was).
door Dan
Yikes. Yes I did indeed. They are rated 15 W/mK. I didn't distinguish the recommendation for thermal pads as only on the VRAM not the GPU / CPU. https://gelidsolutions.com/thermal-solut...
Is this an 'Oh Cripes' disassemble and paste pronto issue? Well I feel silly now.
door Ryan
Sorry, you've got to go back in to fix this ASAP!
door Dan
Ok, I went back in (much easier second time around) an put new screen adhesive on order, just using gaff tape atm. Replaced the VRAM 1mm w.1mm pads and used the Thermal Grizzly paste on the CPU / GPU. Reassembled and, Mac no-starty.
After panic and nausea set in, I went back and re-re-disassembled down to the GPU/CPU to reseat everything, re-re-reassembled (I'm getting good at this now) the Mac still not booting up.
More nausea, took a break for dinner read some stuff online and decided to try to reseat the RAM. This got me 3 beeps. I've been experimenting with the slots and my RAM and have found that if I have anything in slot 1 or 2, no bueno - but if only RAM in 3 and 4, then I can boot at least. Prior to this all 4 were working.
I am unsure how to proceed from here.
door Ryan